
User Manual
About
OpenMaze is a general-purpose 3D experiment building toolbox, developed for use with Unity software. OpenMaze is easy to use and requires no prior coding experience, allowing you to spend less time hacking and more time experimenting! This User Manual contains everything that you need to know about building experiments using OpenMaze.
Get Involved!
OpenMaze has been carefully designed with future development in mind. Knowing that our vision for OpenMaze cannot foresee the full scope of features that the field will require, we are committed to keeping OpenMaze free and open source. We believe that through community feedback and collaboration, OpenMaze can be refined and augmented to meet the needs of an even more diverse set of experimenters. This process ensures that future versions of OpenMaze will provide needed design features that can be used to create a wider range of tasks. In this spirit, we hope that OpenMaze will be seen not only as a toolbox, but also as a development platform, and we encourage other experimenters to become involved in the development process.
Video Tutorials
If you have not used OpenMaze before, we strongly recommend following along with our Learn OpenMaze video tutorial series. These tutorials provide a hands-on, step-by-step approach to learning the ins-and-outs of the OpenMaze toolbox.
Click Here! To check out the OpenMaze Video Tutorials page.
Software Setup
Download and Setup
OpenMaze requires three pieces of software: the OpenMaze Source Code, the Unity Hub, and a text editor. To get OpenMaze set up on your computer follow these steps:
Step 1: Download the OpenMaze Source Code
Click here, select the latest release version, and download the Source Code (zip) file at the bottom of the page. Once downloaded, extract (or unzip) the folder in an easily accessible directory.
Step 2: Download the Unity Hub
Click here to download the Unity Hub. If you do not already have one, you will need to create a Unity software account and select a Unity software plan. OpenMaze works with any plan type, including the free Personal and Student plans.
Step 3: Set up OpenMaze in the Unity Hub
Open the Unity Hub application, sign in, and ensure that you have a license (it's free too!). Once signed in, click the Add button in the top right of the Projects page and select the unzipped OpenMaze folder from Step 1. When OpenMaze appears in the Unity Hub, click the small yellow triangle beside Unity Software Version. This will prompt you to download the correct version of Unity software (this takes a while!). Once installed, navigate back to the Projects page. The yellow triangle should be replaced with a Unity software version number. You can now click the OpenMaze project to open it in the Unity Editor. You may be asked if you would like to update Unity software - click no.
Step 4: Choosing a Text Editor
You will also need a text editor for creating and editing OpenMaze Configuration Files. Configuration Files are formatted in JavaScript Object Notation (JSON) and must be formatted correctly to run. For this reason, we recommend using a text editor with a JSON lint tool which will alert you when your formatting is incorrect. We recommend using Sublime Text or Atom; both of which can be augmented with JSON lint packages.
Click Here! To follow along with a video tutorial on how to set up OpenMaze.
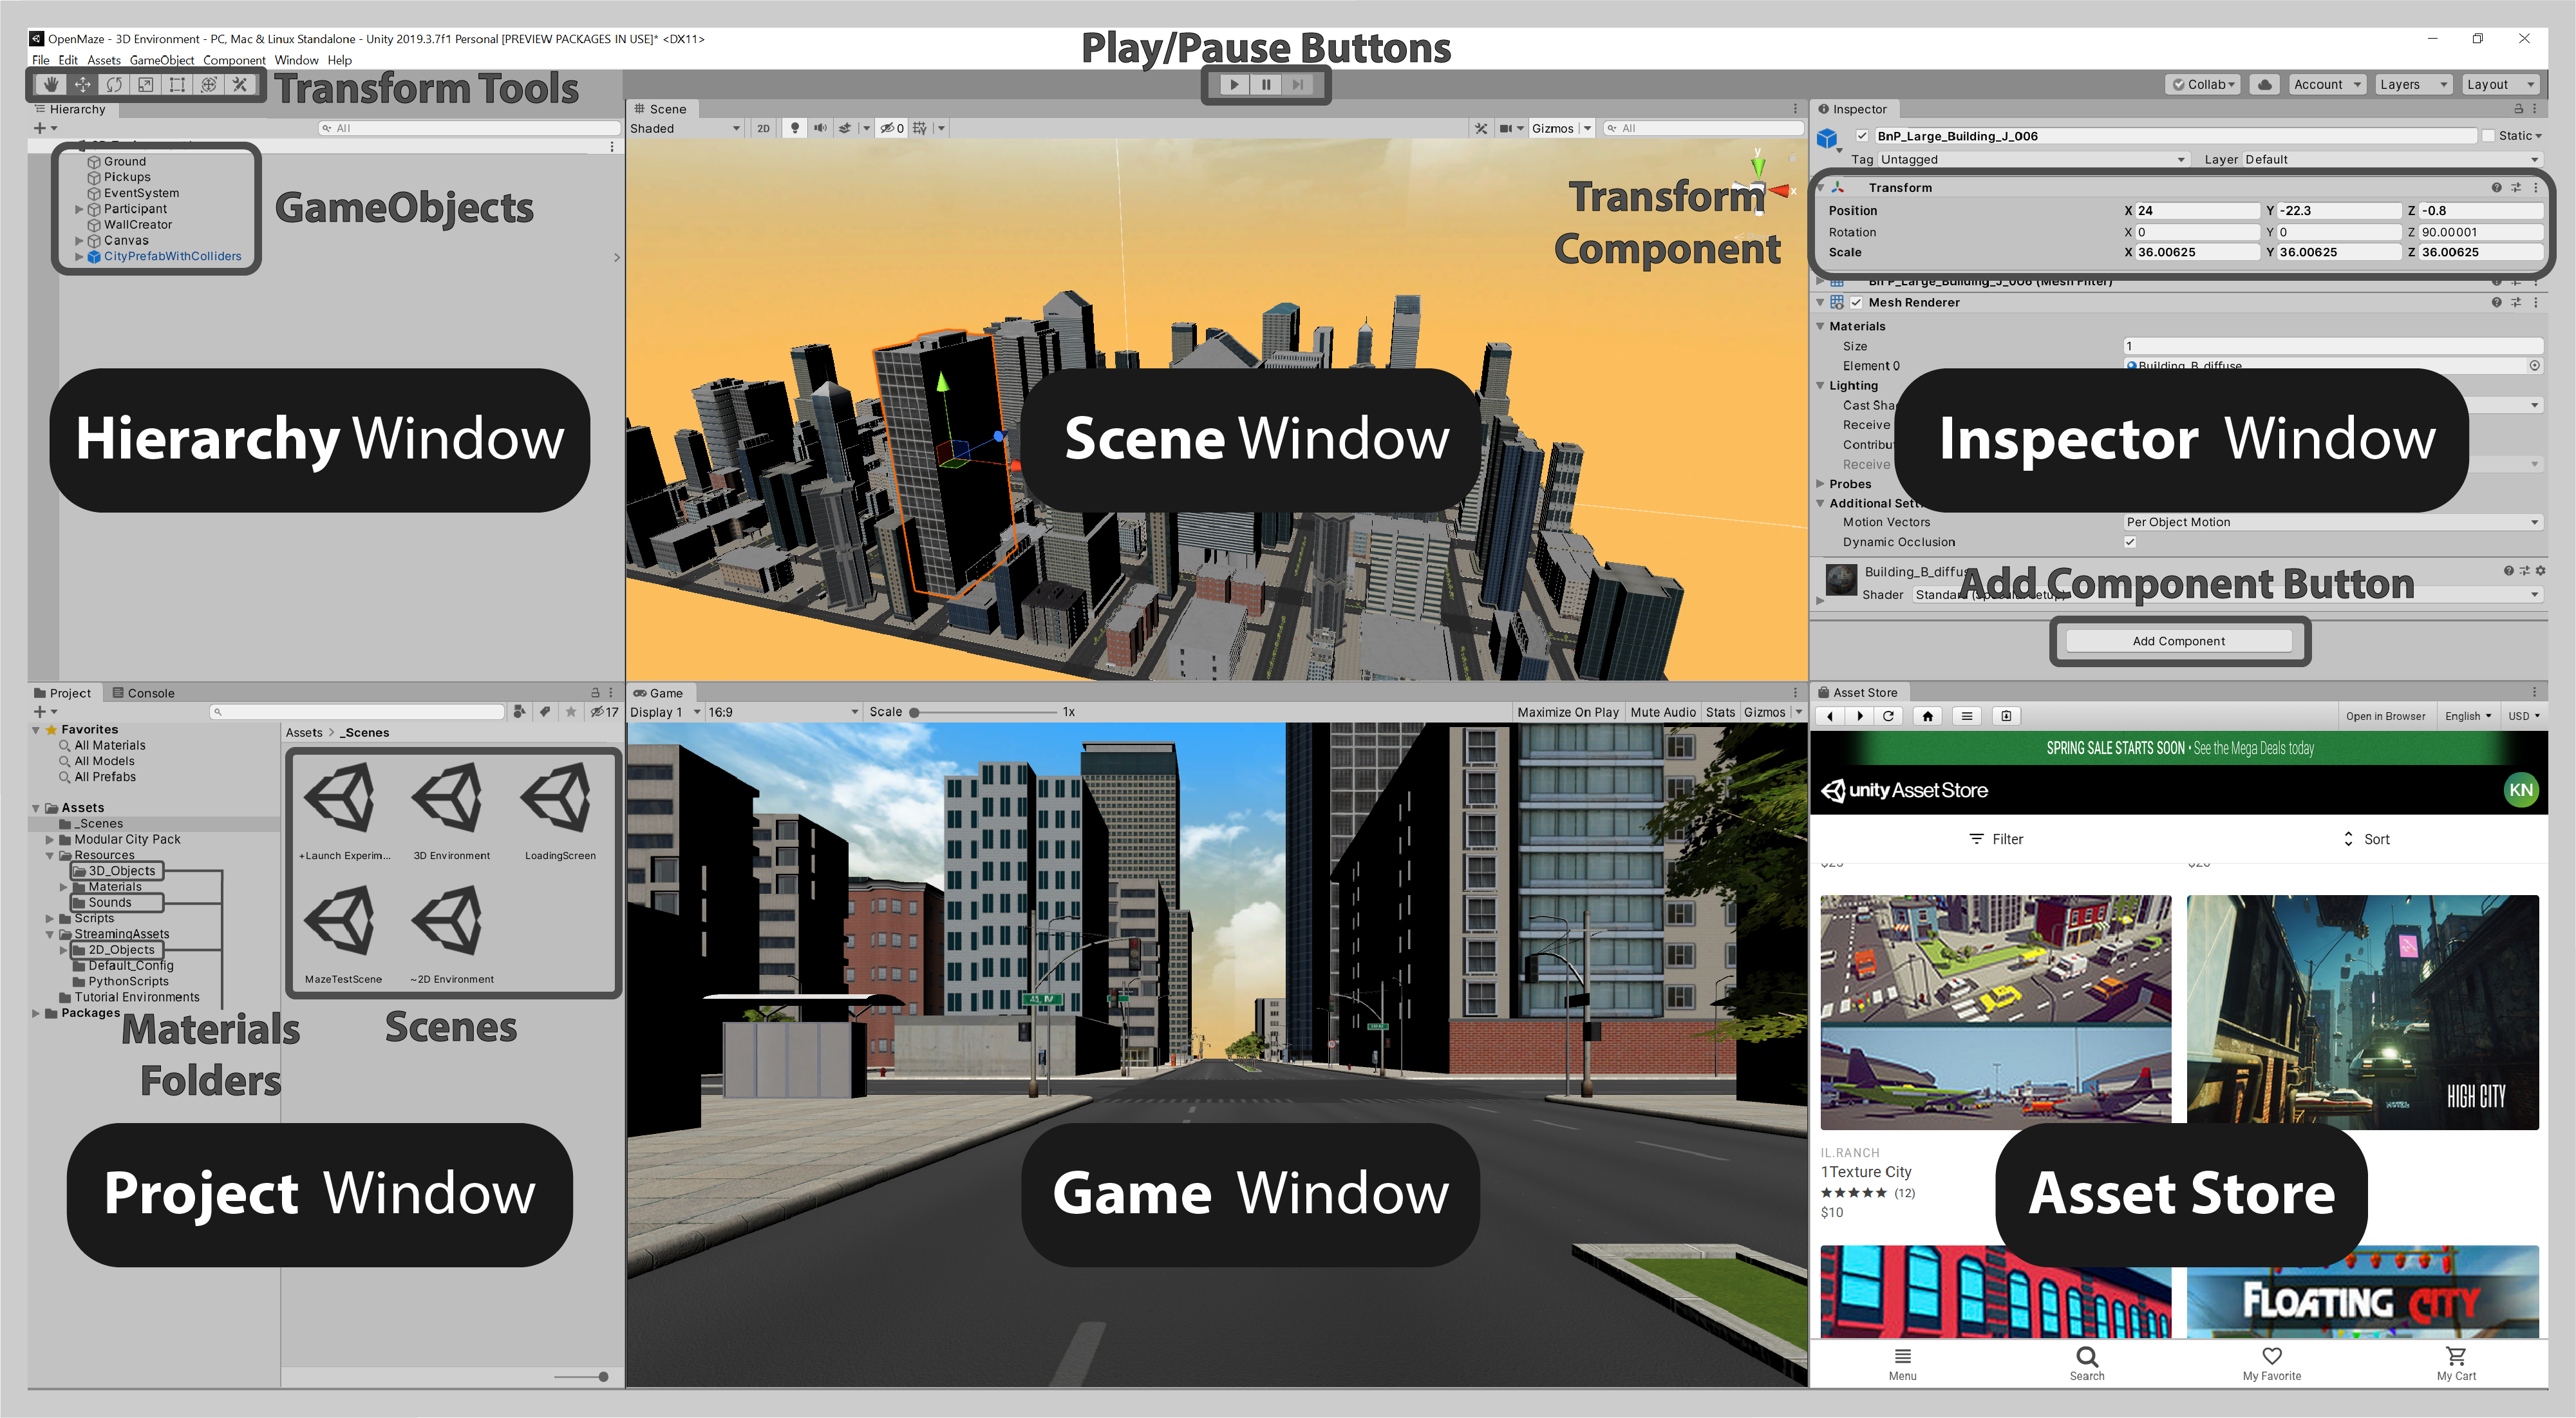
The Unity Editor
We will be referencing different aspects of the Unity Editor throughout the User Manual; you can use the figure below as a quick reference.
Scenes
What is a Scene?
Scenes contain the portion of your 3D environment(s) that will remain fixed throughout the entire experiment (e.g., a city, a rural landscape, an interior façade). Any number of Scenes, and thus 3D environments, can be created to suit the needs of your experiment design. Each new Scene begins as a blank canvas on which 3D Models can be placed, manipulated, and arranged using intuitive point-and-click/drag-and-drop tools that are provided within the Unity Editor. Below we detail how to create a new OpenMaze-compatible 3D environment Scene, then describe how to build a 3D environment within it.
Creating a New Scene
OpenMaze comes with one OpenMaze-compatible 3D environment Scene which can be used and/or duplicated to create additional OpenMaze-compatible 3D environment Scenes. To create a new OpenMaze-compatible 3D environment Scene follow these steps:
Step 1: Open the 3D Environment Scene
Navigate to the Project window and expand the Assets folder. Double-click the _Scenes folder to open it. The contents of the folder will be displayed in the adjacent window to the right. Double-click the 3D Environment Scene icon to open it in the Unity Editor.
Step 2: Duplicate the 3D Environment Scene
Click the Edit drop-down menu at the top of the screen and select Duplicate. The duplicated Scene will be added to the _Scenes folder (feel free to rename it anything you please).
Click Here! To watch our video tutorial on creating OpenMaze-compatible Scenes.
Building 3D Environments
As you will notice, the 3D Environment Scene is empty. That is because OpenMaze does not come with any pre-built 3D environments. Instead, we have left it up to you to create 3D environments that are perfectly suited to meet the needs of your experiment design.
Importing 3D Models
To get started, you will need to import 3D Models into your OpenMaze project. There are two methods for importing 3D Models into your OpenMaze project:
Method 1: The Unity Asset Store
The Unity Asset Store can be accessed directly within the Unity Editor by clicking on the Asset Store tab (beside the Scene window tab). You can then use the search tool to find the 3D Models that you require for your experiment. Once you find something you like, click the Download button. Then, when prompted, click the Import button. Once imported, the 3D Models will be accessible in the Project window.
Method 2: Importing third-party 3D Models
You can also add 3D Models that have been created using third-party software. The Unity Editor provides import support for a wide range of 3D Model file types. Files can simply be dragged-and-dropped into the desired folder within the Project window.
Adding 3D Models to Scenes
Step 1: Open your Scene
Using the Project window, open the Scene you wish to develop in the Unity Editor.
Step 2: Add 3D Models to the Scene
Staying within the Project window, navigate to the folder containing the 3D Model(s) you wish to use. Drag-and-drop the 3D Model(s) into the Scene window.
Step 3: Arrange the 3D Models
Use the Transform tools in the top left of the Unity Editor to change the Position, Rotation, and Scale Components of the 3D Model.
Click Here! For an in-depth demonstration of the Unity Transform tools.
Step 4: Add Collider Components
A Collider Component can be added to a 3D Model to ensure that your participant cannot walk straight through it. Select the 3D Model in the Scene or Hierarchy window, then click the Add Component button in the Inspector window. Search "collider" and select the Collider Component that best suits the 3D Model.
Scene Space
We will be referencing the Scene axis as well as the Transform Components (i.e. Position, Rotation, and Scale) of 3D Models throughout the User Manual; use the figure below as a quick reference when needed.

Scene Compatibility
Many Unity Asset Store packages will come with Scenes that contain prefabricated 3D environments which can serve as a base for your experiment. Any Scene can be made compatible with OpenMaze by adding the necessary OpenMaze GameObjects to it. To do so, follow these steps:
Step 1: Copy the OpenMaze GameObjects
With the 3D Environment Scene opened in the Unity Editor, select all the GameObjects contained within the Hierarchy window. Right-click the selected GameObjects and select Copy.
Step 2: Add the OpenMaze GameObjects to the non-OpenMaze Scene
Open the non-OpenMaze Scene in the Unity Editor, right-click within the Hierarchy window and select Paste. The Scene will now be compatible with OpenMaze.
Using Scenes
Adding Scenes to the Project Build
Scenes must be added to the Project Build before they can be utilized by OpenMaze Configuration Files. Use the following steps to add a Scene to the Project Build:
Step 1: Open the Scene in the Unity Editor
Step 2: Click File and select Build Settings
Step 3: Within the Build Settings window, click the Add Open Scene button
Scenes In Build
Within the Build Settings window, the Scenes In Build subwindow displays all of the Scenes that are currently in the Project Build. You may add, remove, or rearrange Scenes within this window, but you must always ensure that the +Launch Experiment and Loading Screen Scenes occupy the first and second rows, respectively.
Scene Numbers
When a Scene is added to the Project Build it is assigned a Scene Number. The Scene Number appears next to the Scene name in the Scenes In Build subwindow. Scene Numbers are used when creating Task Trials in OpenMaze Configuration Files. You can return to the Build Settings window at any time to add new Scenes or reference Scene Numbers when creating a Configuration File.
Configuration Files
Overview
OpenMaze Configuration Files provide the infrastructure to create tasks within your Scene(s) and orchestrate all other aspects of your experiment. Each Configuration File can be thought of as an experiment session. Much like typical behavioral experiment sessions, each Configuration File consists of experiment blocks containing instructions and trials. Additionally, Configuration Files contain key experiment settings allowing you to make quick changes when necessary. Conveniently, any number of Configuration Files can be created for your Scene(s), each one with a different set of blocks, instructions, and trials. This provides tremendous flexibility, allowing you to quickly create multi-session studies, follow-up experiments, and design completely new experiments within the same Scene(s).
Sections
Each Configuration File includes a Settings section and five Experiment Object Sections: (1) Blocks; (2) Trials; (3) Goals; (4) Landmarks; and (5) Enclosures.
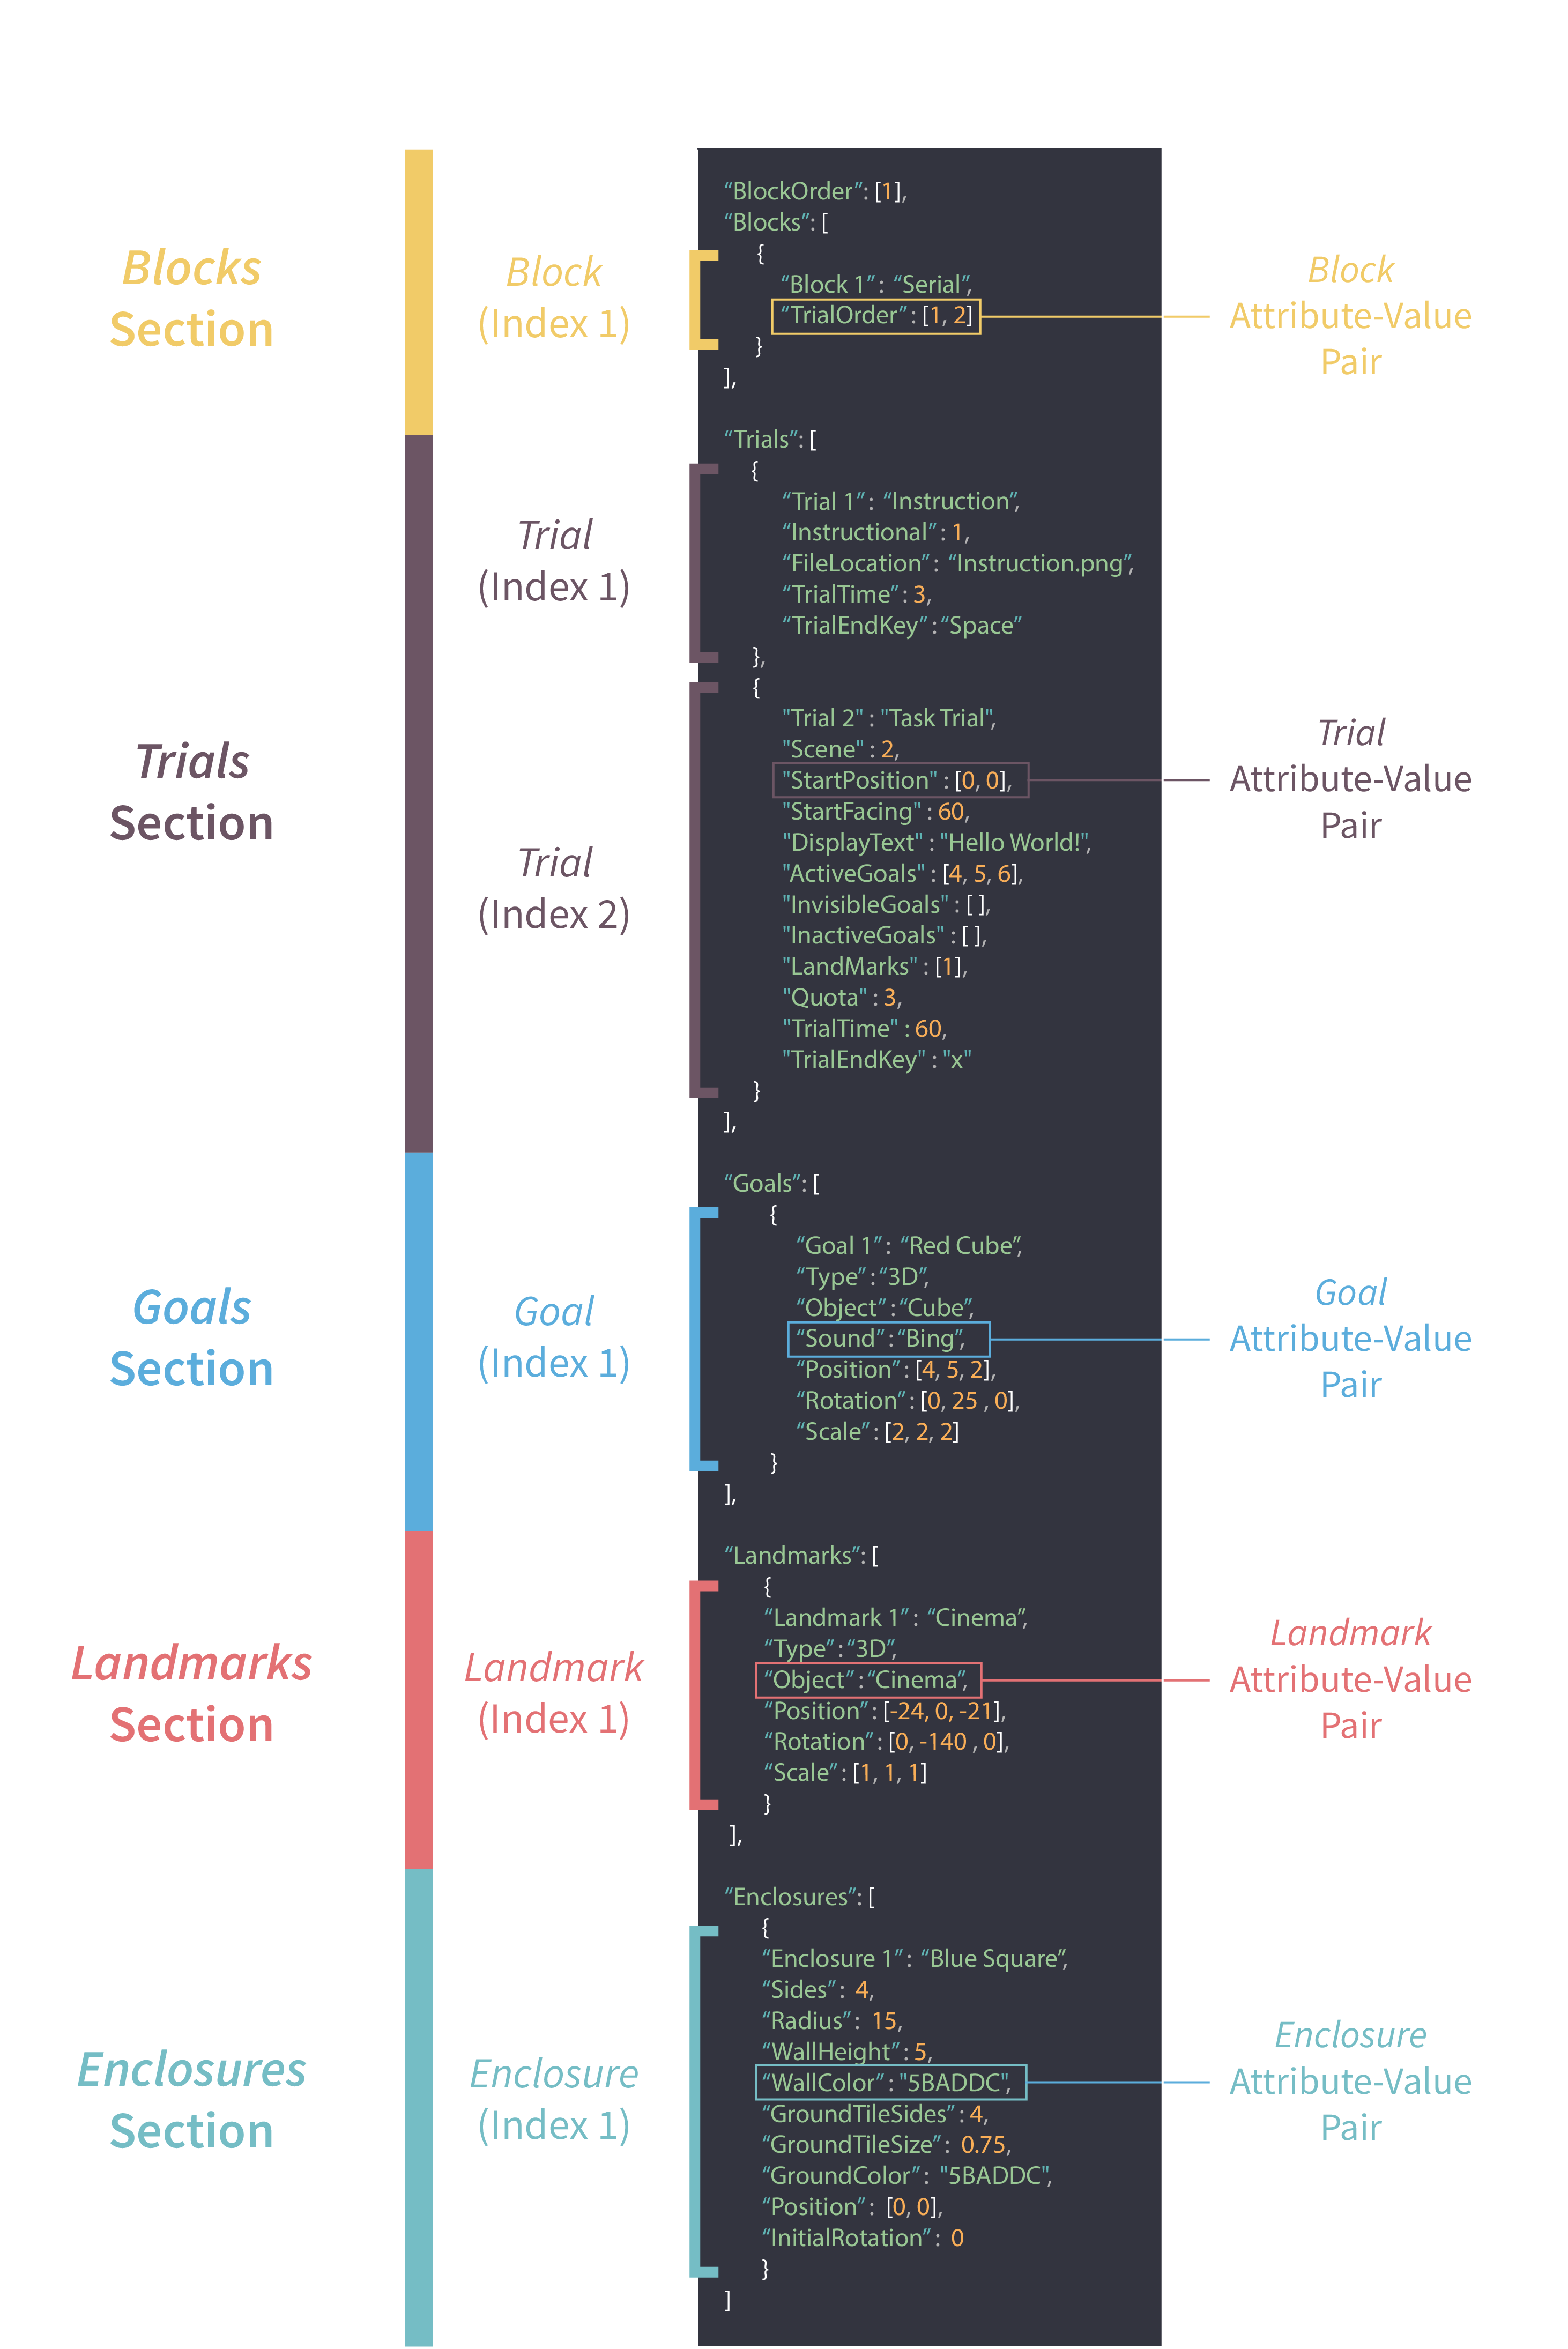
The 6 Sections of OpenMaze Configuration Files
Formatting
Experiment Configuration Files are written in the JavaScript Object Notation (JSON) file format. JSON files provide a simple, human-readable text that stores Arrays of Objects (Object Arrays). Each Object within an Array is defined by a series of Attribute-Value Pairs.
Object Arrays
When talking about OpenMaze Configuration Files we refer to Object Arrays as Sections and will refer to Sections by their Object type (i.e. the Blocks Section, the Trials Section, the Goals Section, the Landmarks Section, and the Enclosures Section). Each Section is defined by a list of Objects contained within a set of square brackets [ ] and Sections are separated by a comma.
Objects
We will refer to Objects as Experiment Objects or simply by their type (i.e. Block(s), Trial(s), Goal(s), Landmark(s), Enclosure(s)). Each Experiment Object is implicitly assigned an index number based on the order that it is defined within its Section starting at 1. Each Experiment Object is defined by a series of Attribute-Value Pairs contained within a set of curly brackets { } and Experiment Objects within the same Section are separated by a comma.
Attribute-Value Pairs
Each Experiment Object type has a unique set of Attribute-Value Pairs; for example, Goals are defined by a different set of Attribute-Value Pairs than Trials. While some Attribute-Value Pairs are necessary, others are optional; for example, Attribute-Value Pairs can be added to a Block to augment the Block with performance criterion. Attribute names must be contained within a set of quotation marks (i.e. "AttributeName") and Values are formatted based on their data type (i.e. string, boolean, float, integer, list, or vector). Attribute-Value Pairs contained within the same Experiment Object are separated by a semicolon.
Note: The order that Attribute-Value Pairs are defined within an Experiment Object does not impact their function
Configuration File Template
OpenMaze provides a Configuration File template that has examples for each Experiment Object type. When creating a new Configuration File, we recommend using a copy of this template. This will allow you to copy and paste Experiment Object examples and simply customize their Attribute-Value Pairs to suit your needs. You can find the Configuration File template in the OpenMaze project folder:
OpenMaze/Configuration_Files/
Configuration_Template
Creating Experiments
Object Hierarchy
Experiments are designed by creating and combining Experiment Objects in a hierarchical structure such that: Goals, Landmarks, and Enclosures are used to create Trials; and Trials are used to create Blocks.
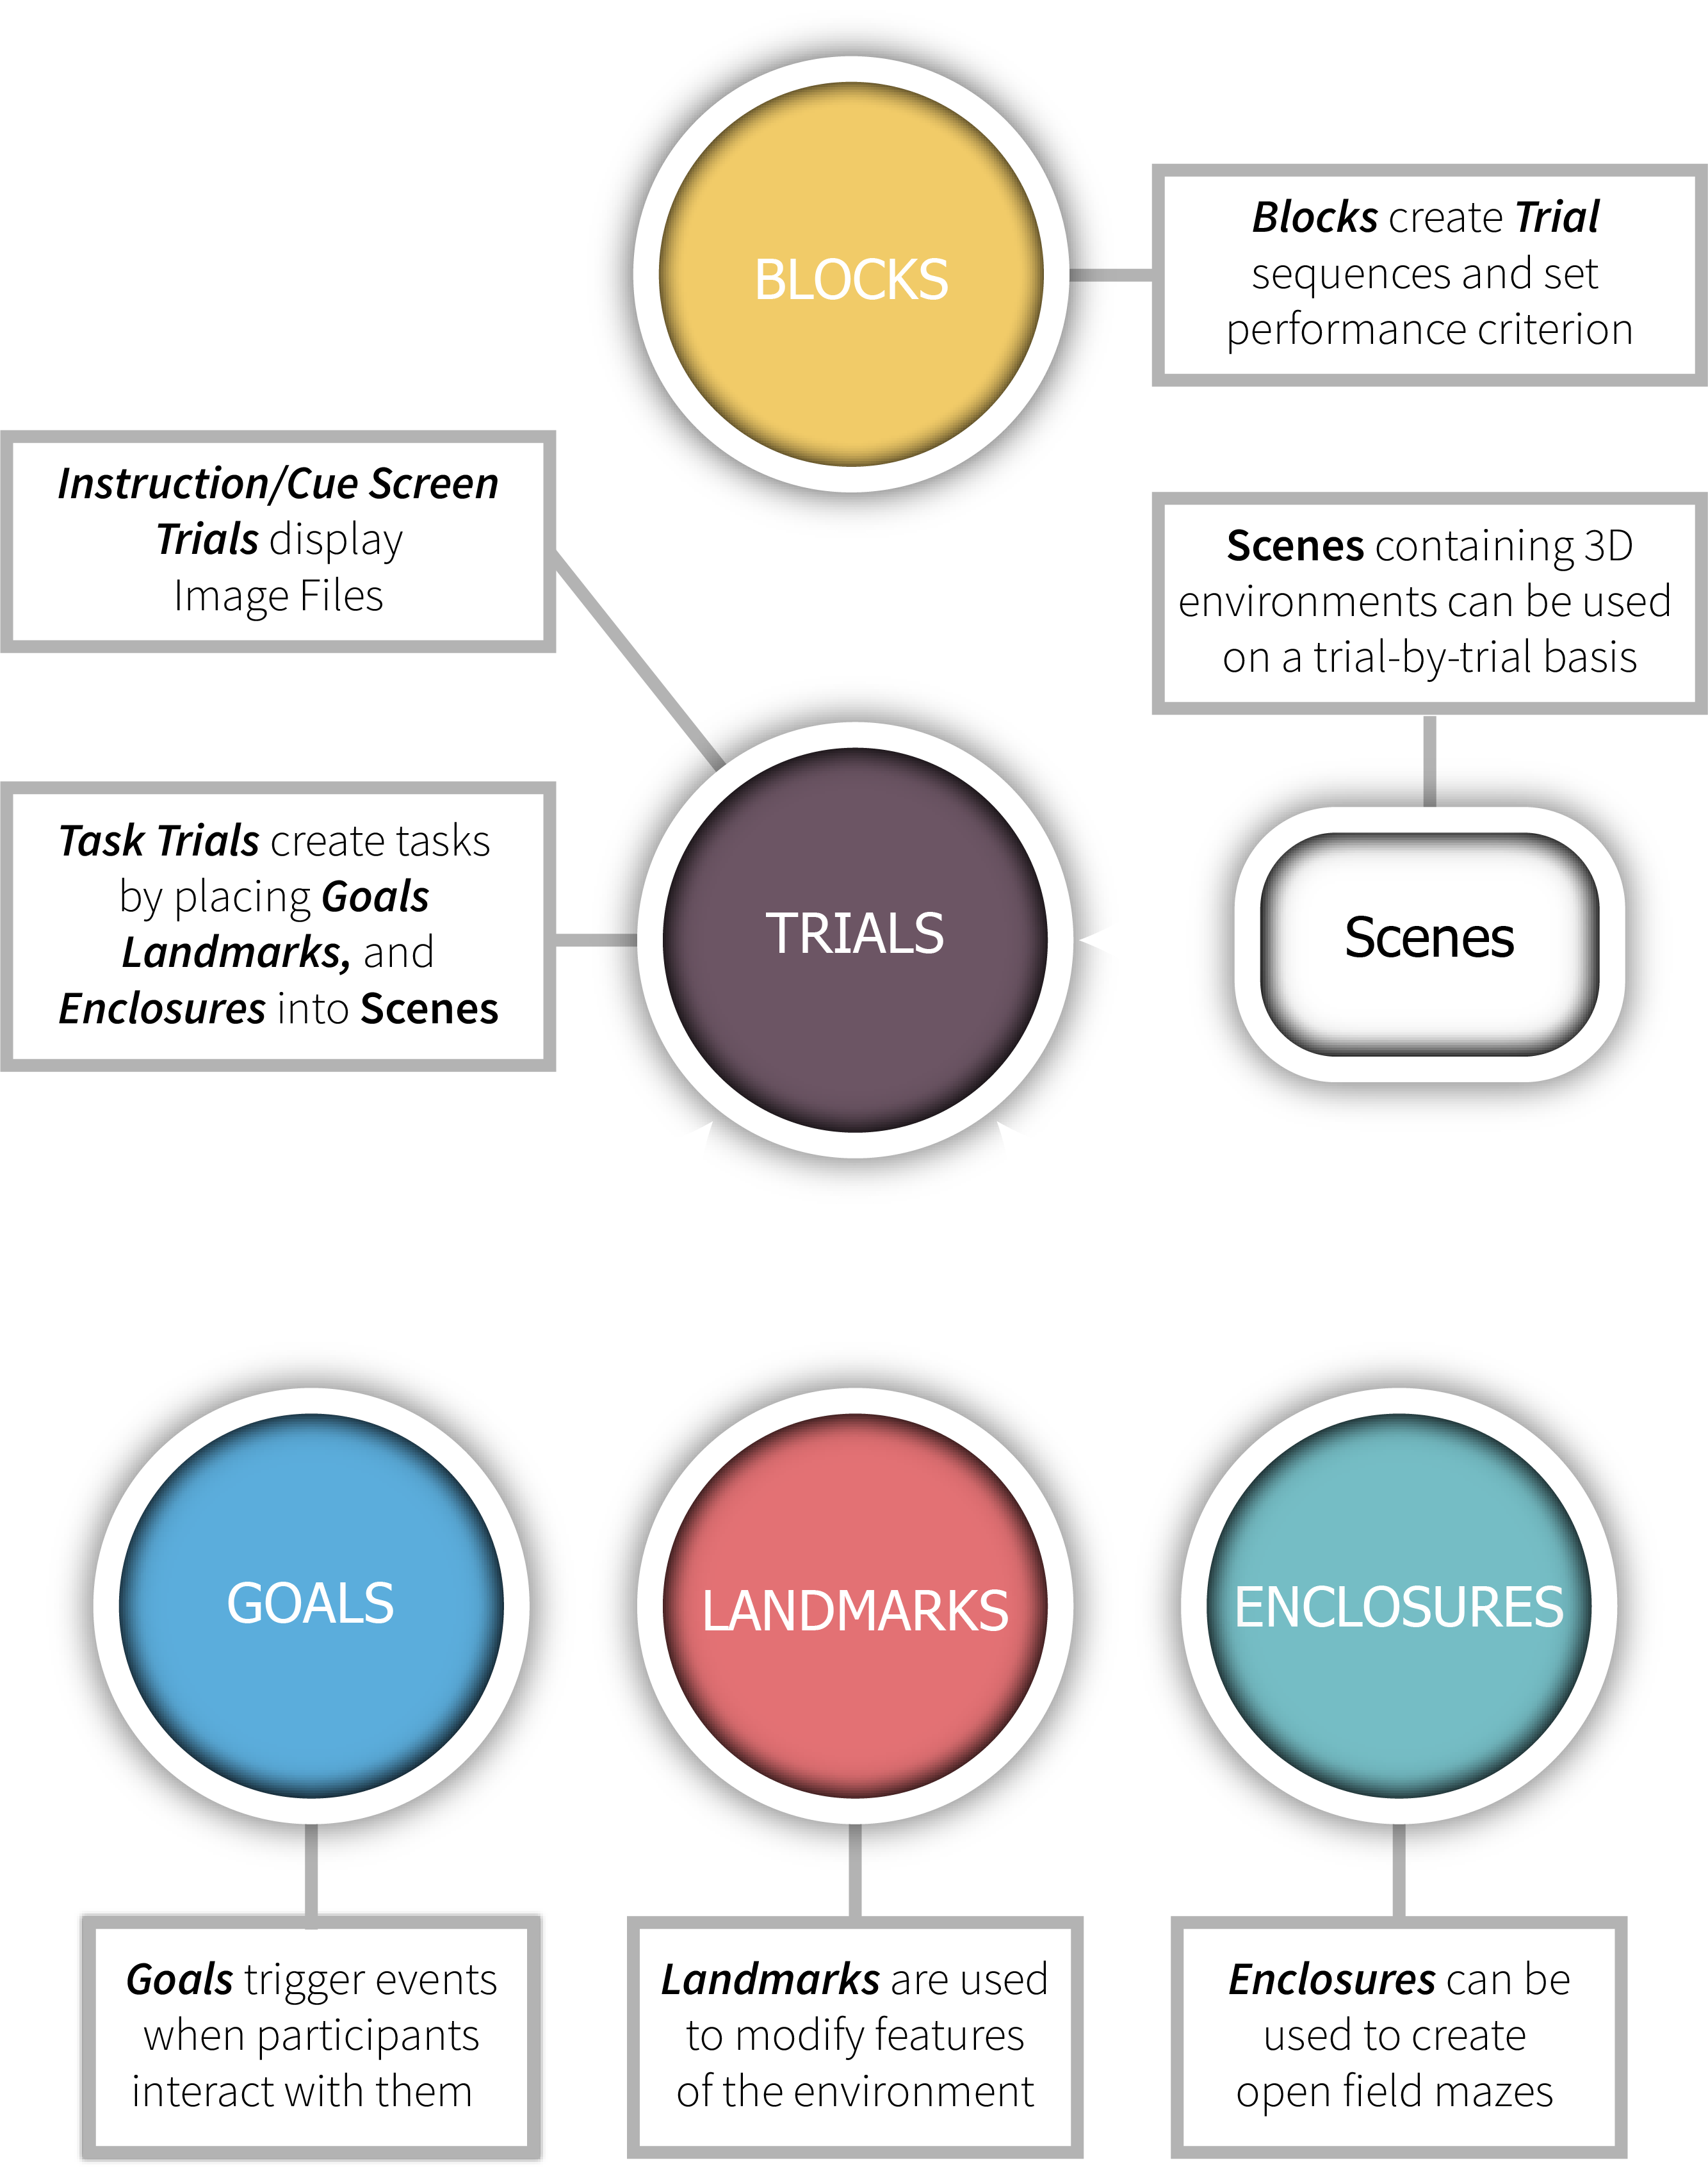
Goals and Landmarks
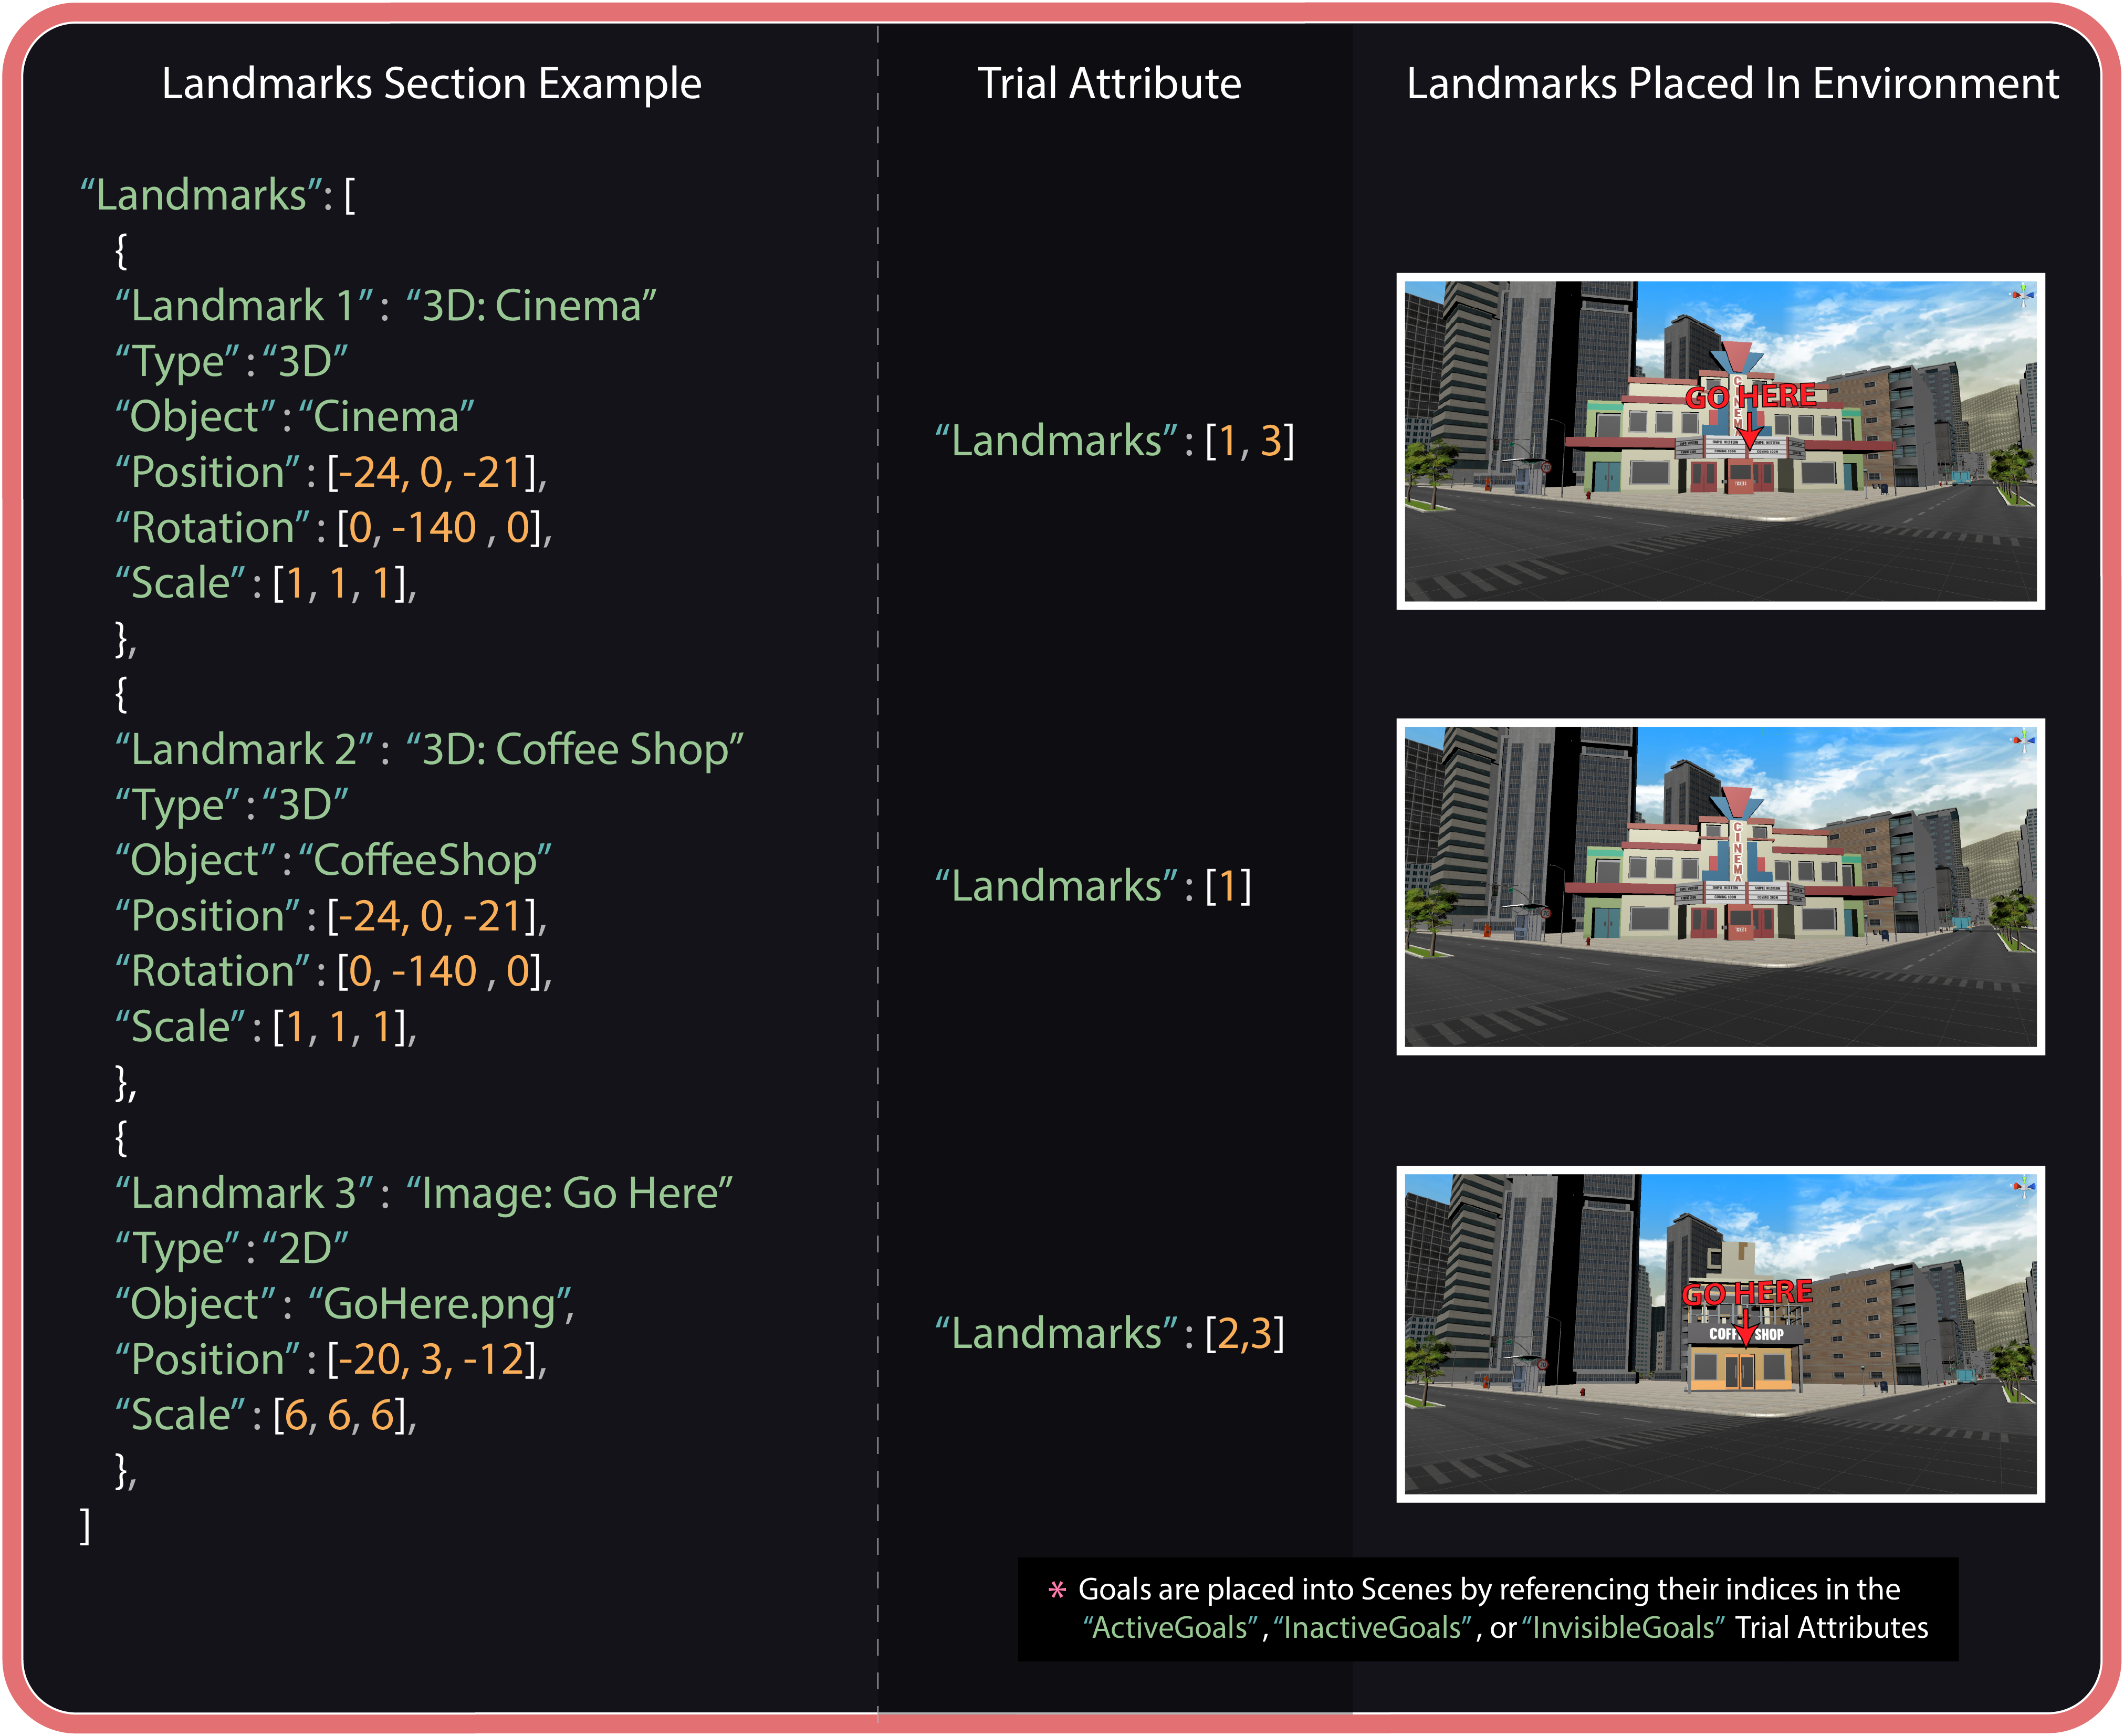
Goals/Landmarks are 3D Models or Image Files that can be placed into Scenes on a trial-by-trial basis. Goals are capable of triggering events when participants interact with them and Landmarks can be used to change the characteristics of the environment. To create a new Goal/Landmark follow the instructions below.
Importing Goal/Landmark Materials
Goals and Landmarks are created from 3D Models or Image Files, and Audio Files can be added to Goals. Before defining Goals/Landmarks in the Configuration File these necessary files must be added to the correct OpenMaze project folders:
3D Models
Assets/Resources/3D_Objects
Image Files
Assets/StreamingAssets/2D_Objects
Audio Files
Assets/Resources/Sounds
IMPORTANT! You must add a Collider Component to 3D Models. With the 3D Model open in the Unity Editor, click the Add Component button in the Inspector window and select a Collider Component.
Creating Goals and Landmarks
Once you have added the necessary materials, you can use them to create Goals/Landmarks in the Configuration File. To create a new Goal/Landmark follow these steps:
To create a new Goal/Landmark, we recommend copying and pasting a premade Goal/Landmark from the Configuration File template and simply customizing its Attribute-Value Pairs to suit your needs.
Step 2: Add a reference Attribute-Value Pair
We recommend including a description Attribute-Value Pair in the form: “Goal #”: “Description” ("Landmark #": "Description"). The "#" corresponds to the Experiment Object's index number which will be used when creating Trials and "Description" can be replaced with identifying information of your choosing.
Step 3: Assign a 3D Model or Image File
Assign a 3D Model or Image File by setting the Value of the Type Attribute to “3D” or "2D", respectively, and setting the Value of the Object Attribute to the name of the 3D Model or Image File.
Step 4: Transform Attributes
The Position, Rotation, and Scale Attributes prescribe the Transform Components that will be used to place the Goal/Landmark in the Scene.
Note: Image File Goals rotate dynamically to ensure that they always face the participant’s viewing angle and thus do not require a Rotation Attribute-Value Pair.
Step 5. Adding Audio Files to Goals
Use the Sound Attribute to assign an Audio File to a Goal using the name of the Audio File as its Value.
Tip: Place the 3D Model into the Scene the way you want it to appear in the Task Trial and copy its Transform Component values (i.e. Position, Rotation, and Scale) into the Configuration File. Then remove the 3D Model from the Scene. Images cannot be placed directly into a Scene; instead, use a 3D Model as a stand-in.
Goals Configuration File Example
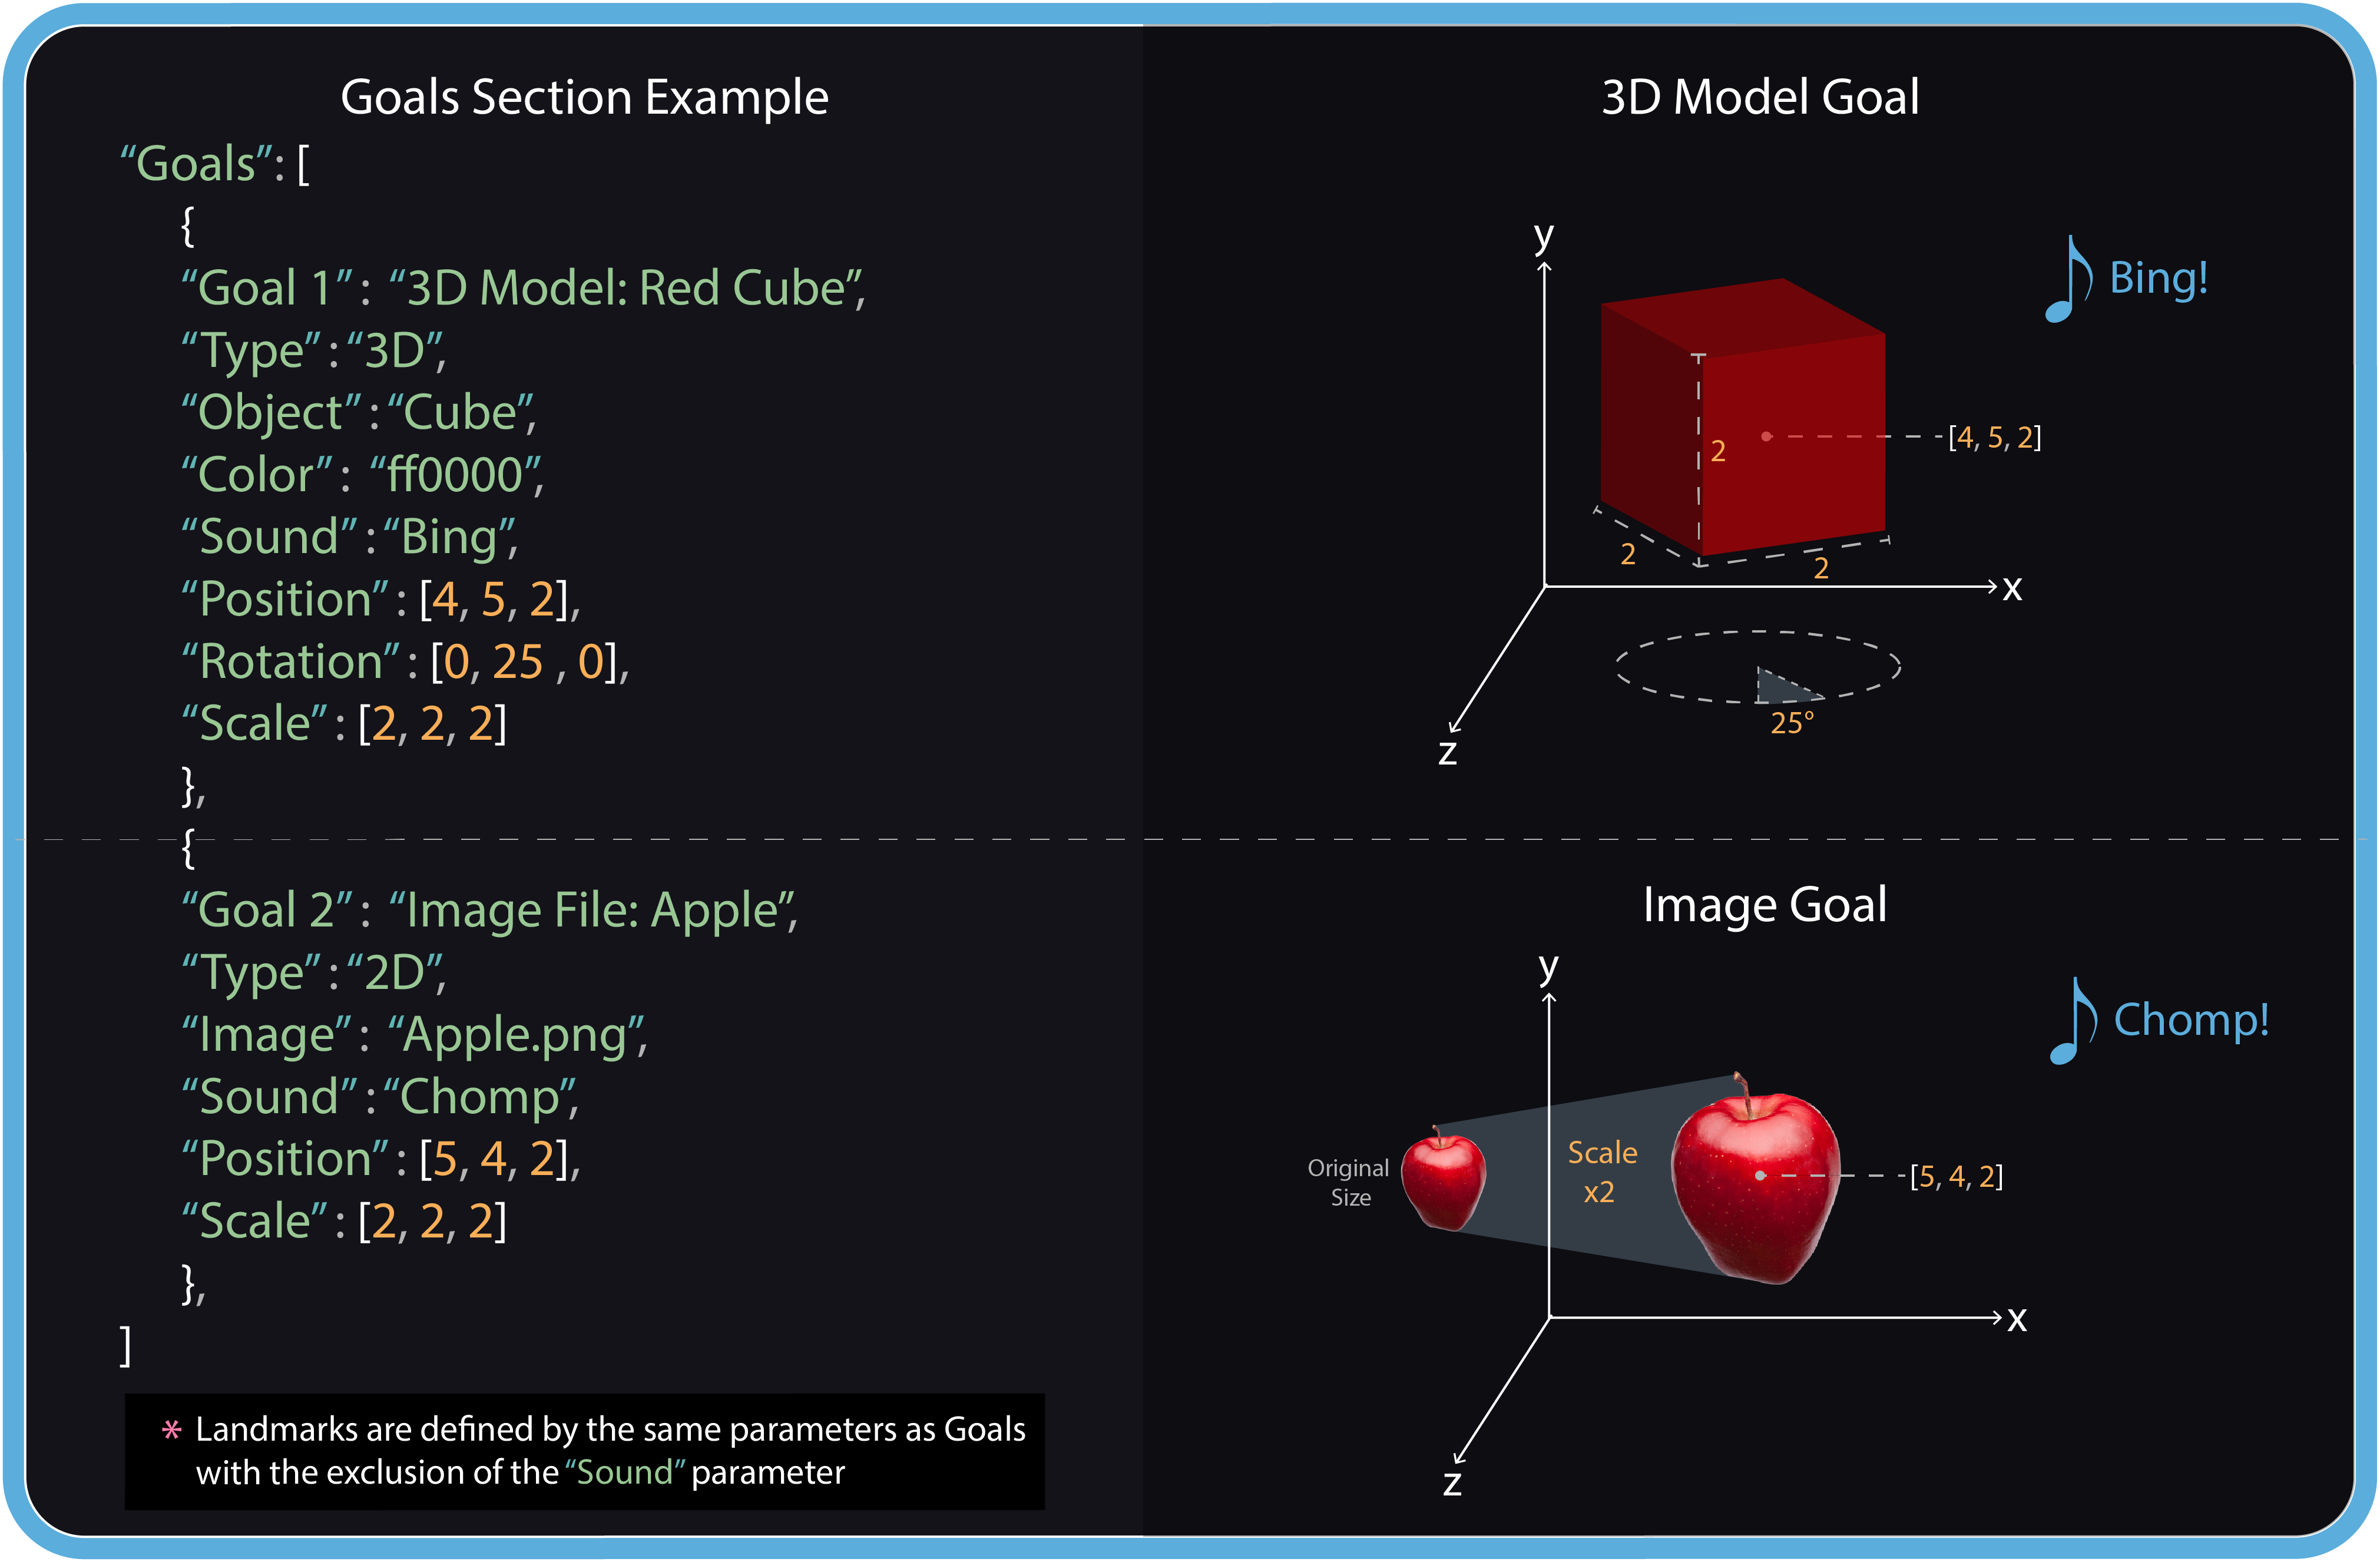
Landmarks Configuration File Example
Goals/Landmarks Attribute-Value Pairs
| Attribute | Example Value | Description |
|---|---|---|
| Goal/Landmark # | “Description” | Can be added to keep track of indices and used as a reference when creating Task Trials. |
| Type | “3D” or “2D” | Defines whether the object is a 3D Model or an Image File. Directs OpenMaze to look for the object in the associated folder (i.e. 3D_Objects, 2D_Objects). |
| Object | “Image.png” | The name of the 3D Model or Image File contained in the 3D_Objects or 2D_Objects folder, respectively. Subfolders can be used by including the directory extension (e.g., subfoldername/Apple.png). File extensions (e.g., .png, .jpg) must be included when using Image Files. |
| Position | [0,0,0] | Corresponds to the [x,y,z] Position Component of the Goal/Landmark within a Scene. |
| Rotation | [30,60,90] | Corresponds to the [x,y,z] Rotation Component of the Goal/Landmark within a Scene. Note: Not used for Image Files which dynamically rotate to always face the participant. |
| Scale | [1,1,1] | Corresponds to the [x,y,z] Scale Component of the Goal/Landmark within a Scene. |
| Color | “ffffff” | A 6-digit HEX color code. Can be used for simple geometric 3D Models to change their color. Click here to find HEX color codes for your objects. |
| Sound* | “Bing.wav” | Upon collision the Audio File will play. Can use directory extensions within the Sound folder (e.g., subfoldername/Bing.wav). *Used only for Goals. |
Enclosures
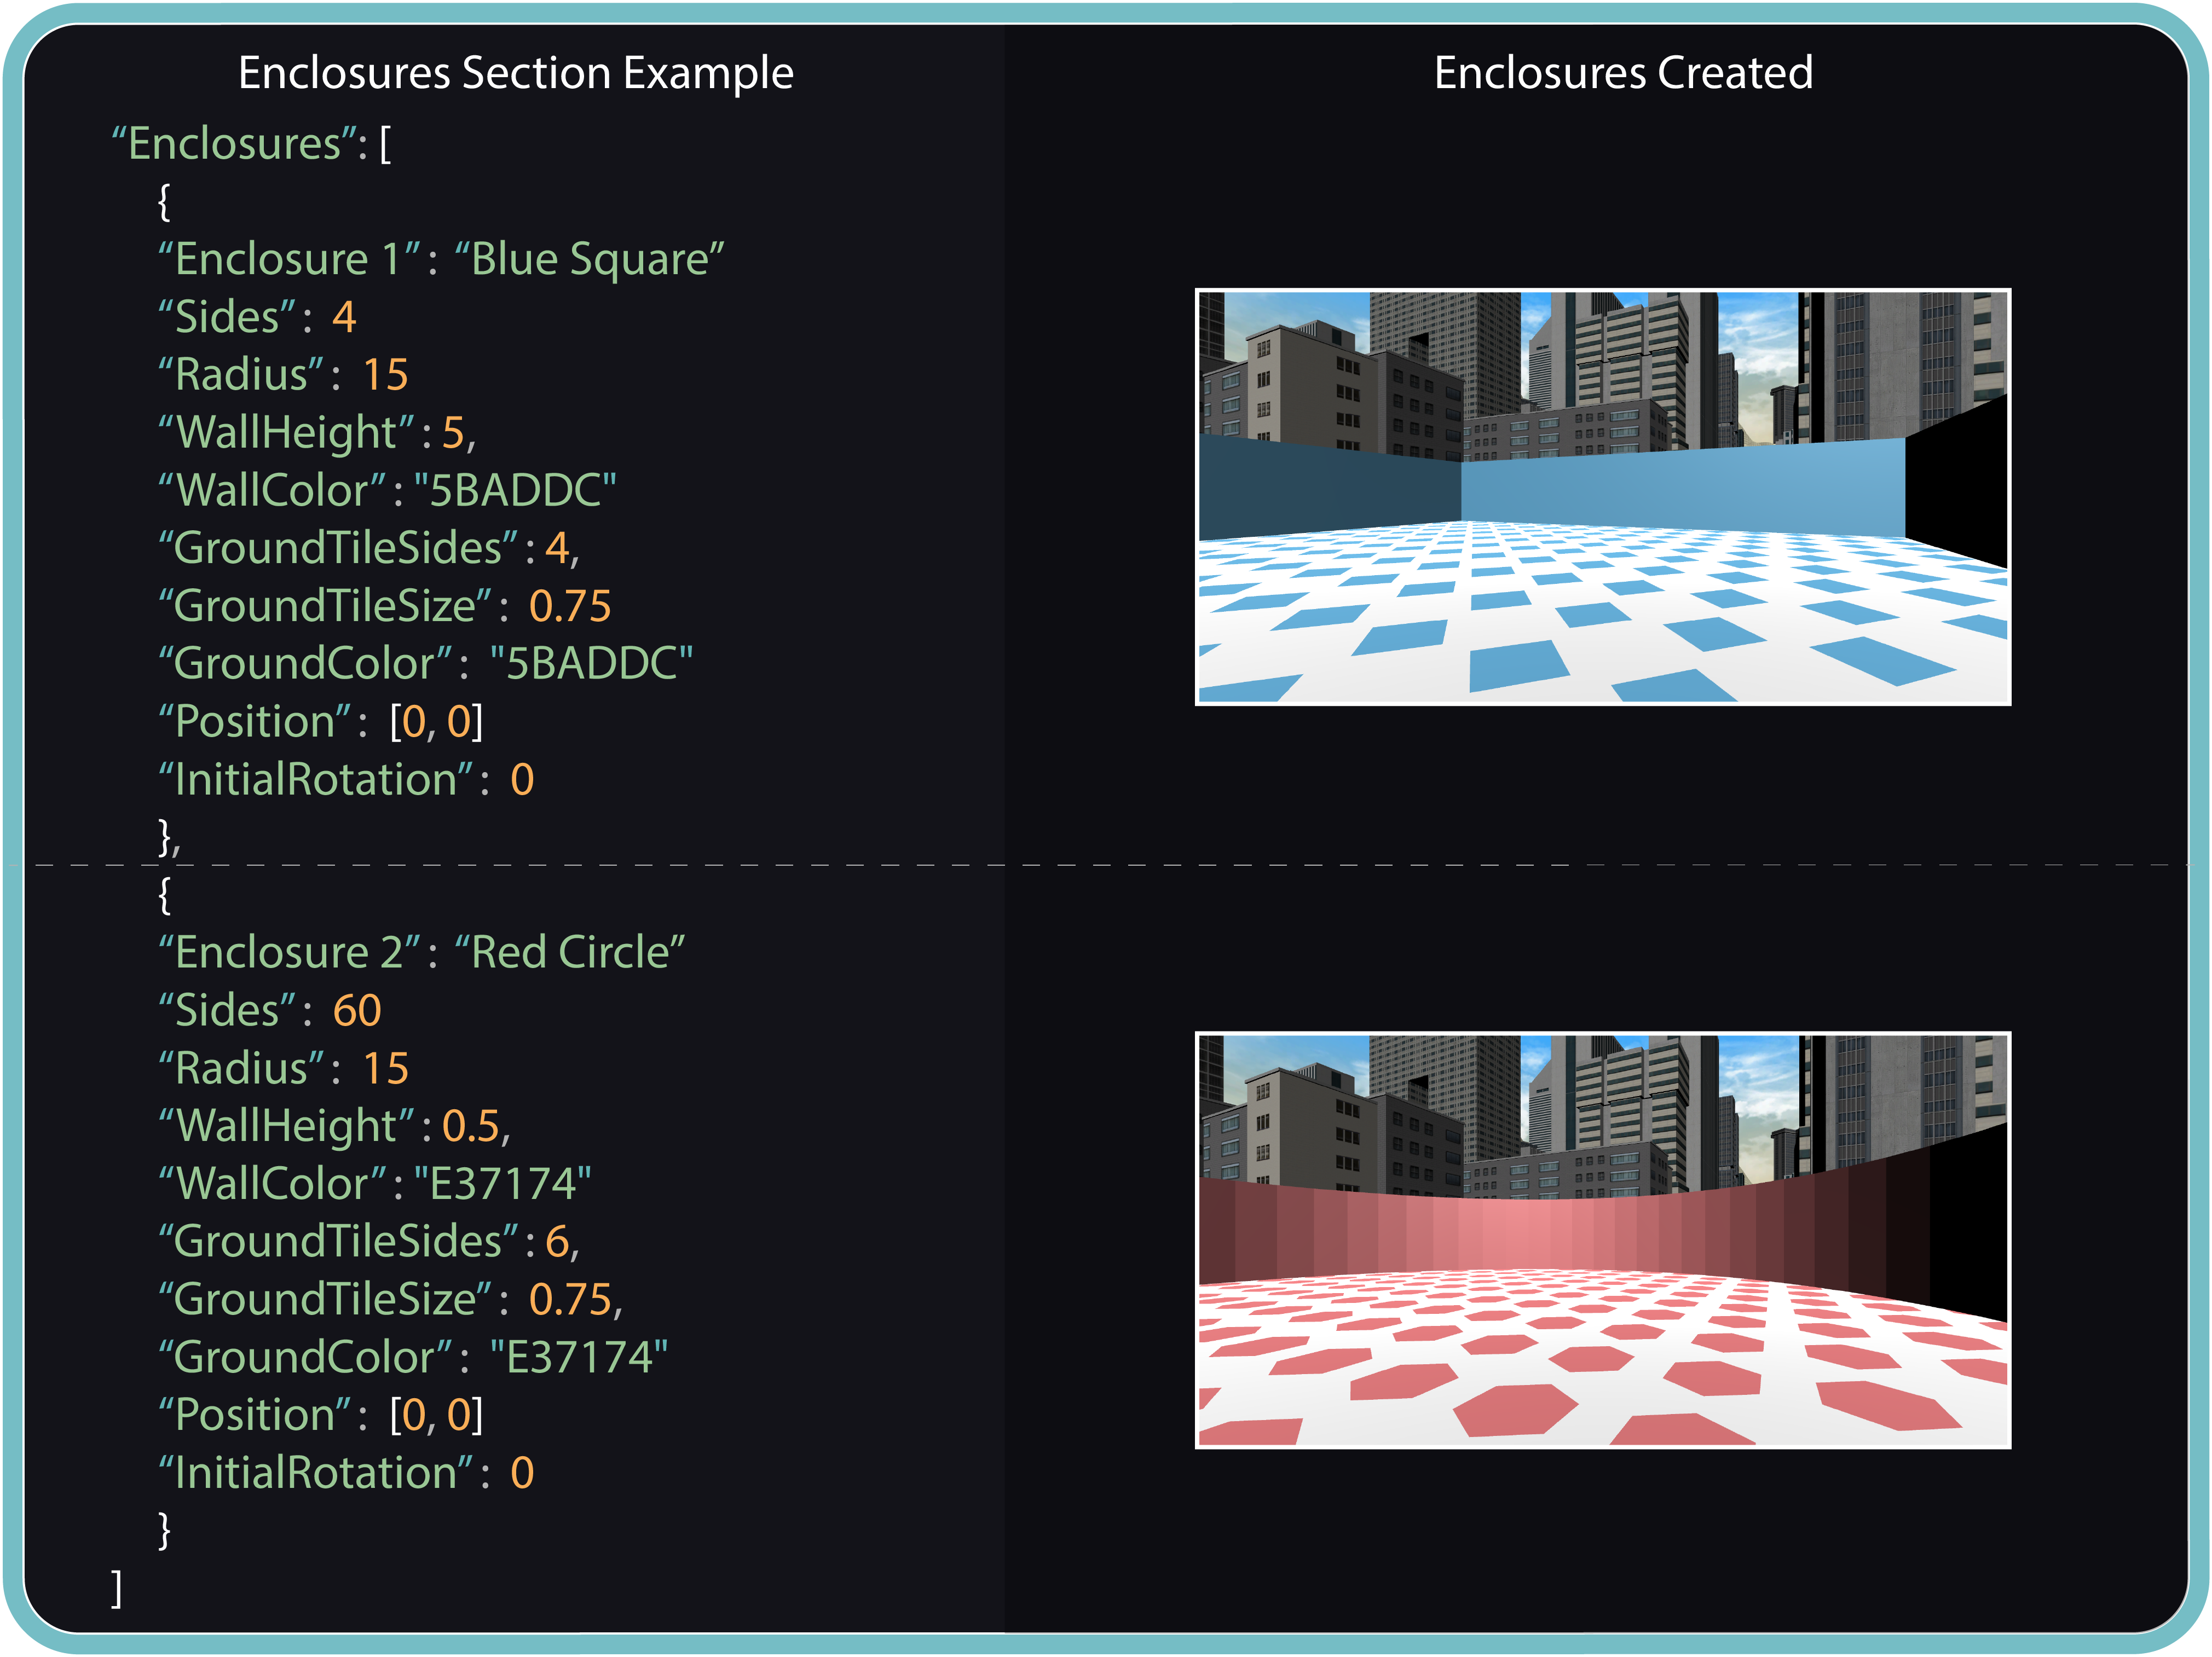
Enclosures can be used to create custom open field mazes that can be added to Scenes on a trial-by-trial basis. Enclosures do not require any additional materials and are created solely by defining Attribute-Value Pairs. To create an Enclosure, use the following steps:
We recommend copying and pasting an Enclosure from the Configuration File template and simply customizing the Attribute-Value Pairs to suit your needs.
Step 2: Add a reference Attribute-Value Pair
We recommend including a description Attribute-Value Pair in the form: “Enclosure #”: “Description”. The "#" corresponds to the Enclosure's index number which will be used when creating Trials and "Description" can be replaced with identifying information of your choosing.
Step 3: Size, Shape, and Color
Enclosures are created by connecting walls that are placed tangent to a circular area. Thus, the size of an Enclosure is described using the Radius Attribute and the shape is dictated by the Sides Attribute which dictates the number of walls that will be used (4 = square, 5 = pentagon, and so on). To customize the walls, use the WallHeight and WallColor Attributes.
Step 4: Enclosure Floors
Enclosures can be created with a simple geometric floor tiling which provides greater depth perception for participants. Change the size, shape, and color of the tiles using the GroundTileSize, GroundTileSides, and GroundColor Attributes respectively.
Step 5: Enclosure Placement
Allows you to change where the Enclosure will be placed within a Scene. Corresponds to the Enclosure's x and z Position values. Enclosures are always placed at ground level (i.e. Position y-value = 0). The Rotation Attribute can be used to rotate the Enclosure about the y-axis.
Click Here! To follow along with our Enclosures tutorial video.
Enclosures Configuration File Example
Enclosures Attribute-Value Pairs
| Attribute | Example Value | Description |
|---|---|---|
| Enclosure # | “Description” | Can be added to keep track of indices and used as a reference when creating Task Trials. |
| Sides | 5 | The number of walls that will be used to create the Enclosure. Used to define the Enclosures shape (e.g., 4 = square, 5 = pentagon, 6 = hexagon). |
| Radius | 15 | Defines the size of the Enclosure. Walls are created tangent to a circle with this Radius. |
| WallHeight | 4.5 | Sets the height of the Enclosure walls. |
| WallColor | “00ff00” | A 6-digit HEX color code which defines the color of the Enclosure walls. Enclosures can be made invisible by using “ffffff00”. Click here to find HEX color codes. |
| GroundTileSides | 40 | Works like the Sides Attribute. Allows experimenters to customize the shape of the Enclosure floor tiles. |
| GroundTileSize | 0.5 | A number between 0-1 which manipulates the size of the ground tiles. Set to 0 (zero) to remove tiling. |
| GroundColor | “ff0000” | A 6-digit HEX color code which defines the color of the Enclosure floor tiles. Use “ffffff00” to remove the Enclosure's floor. Click here to find HEX color codes. |
Task Trials
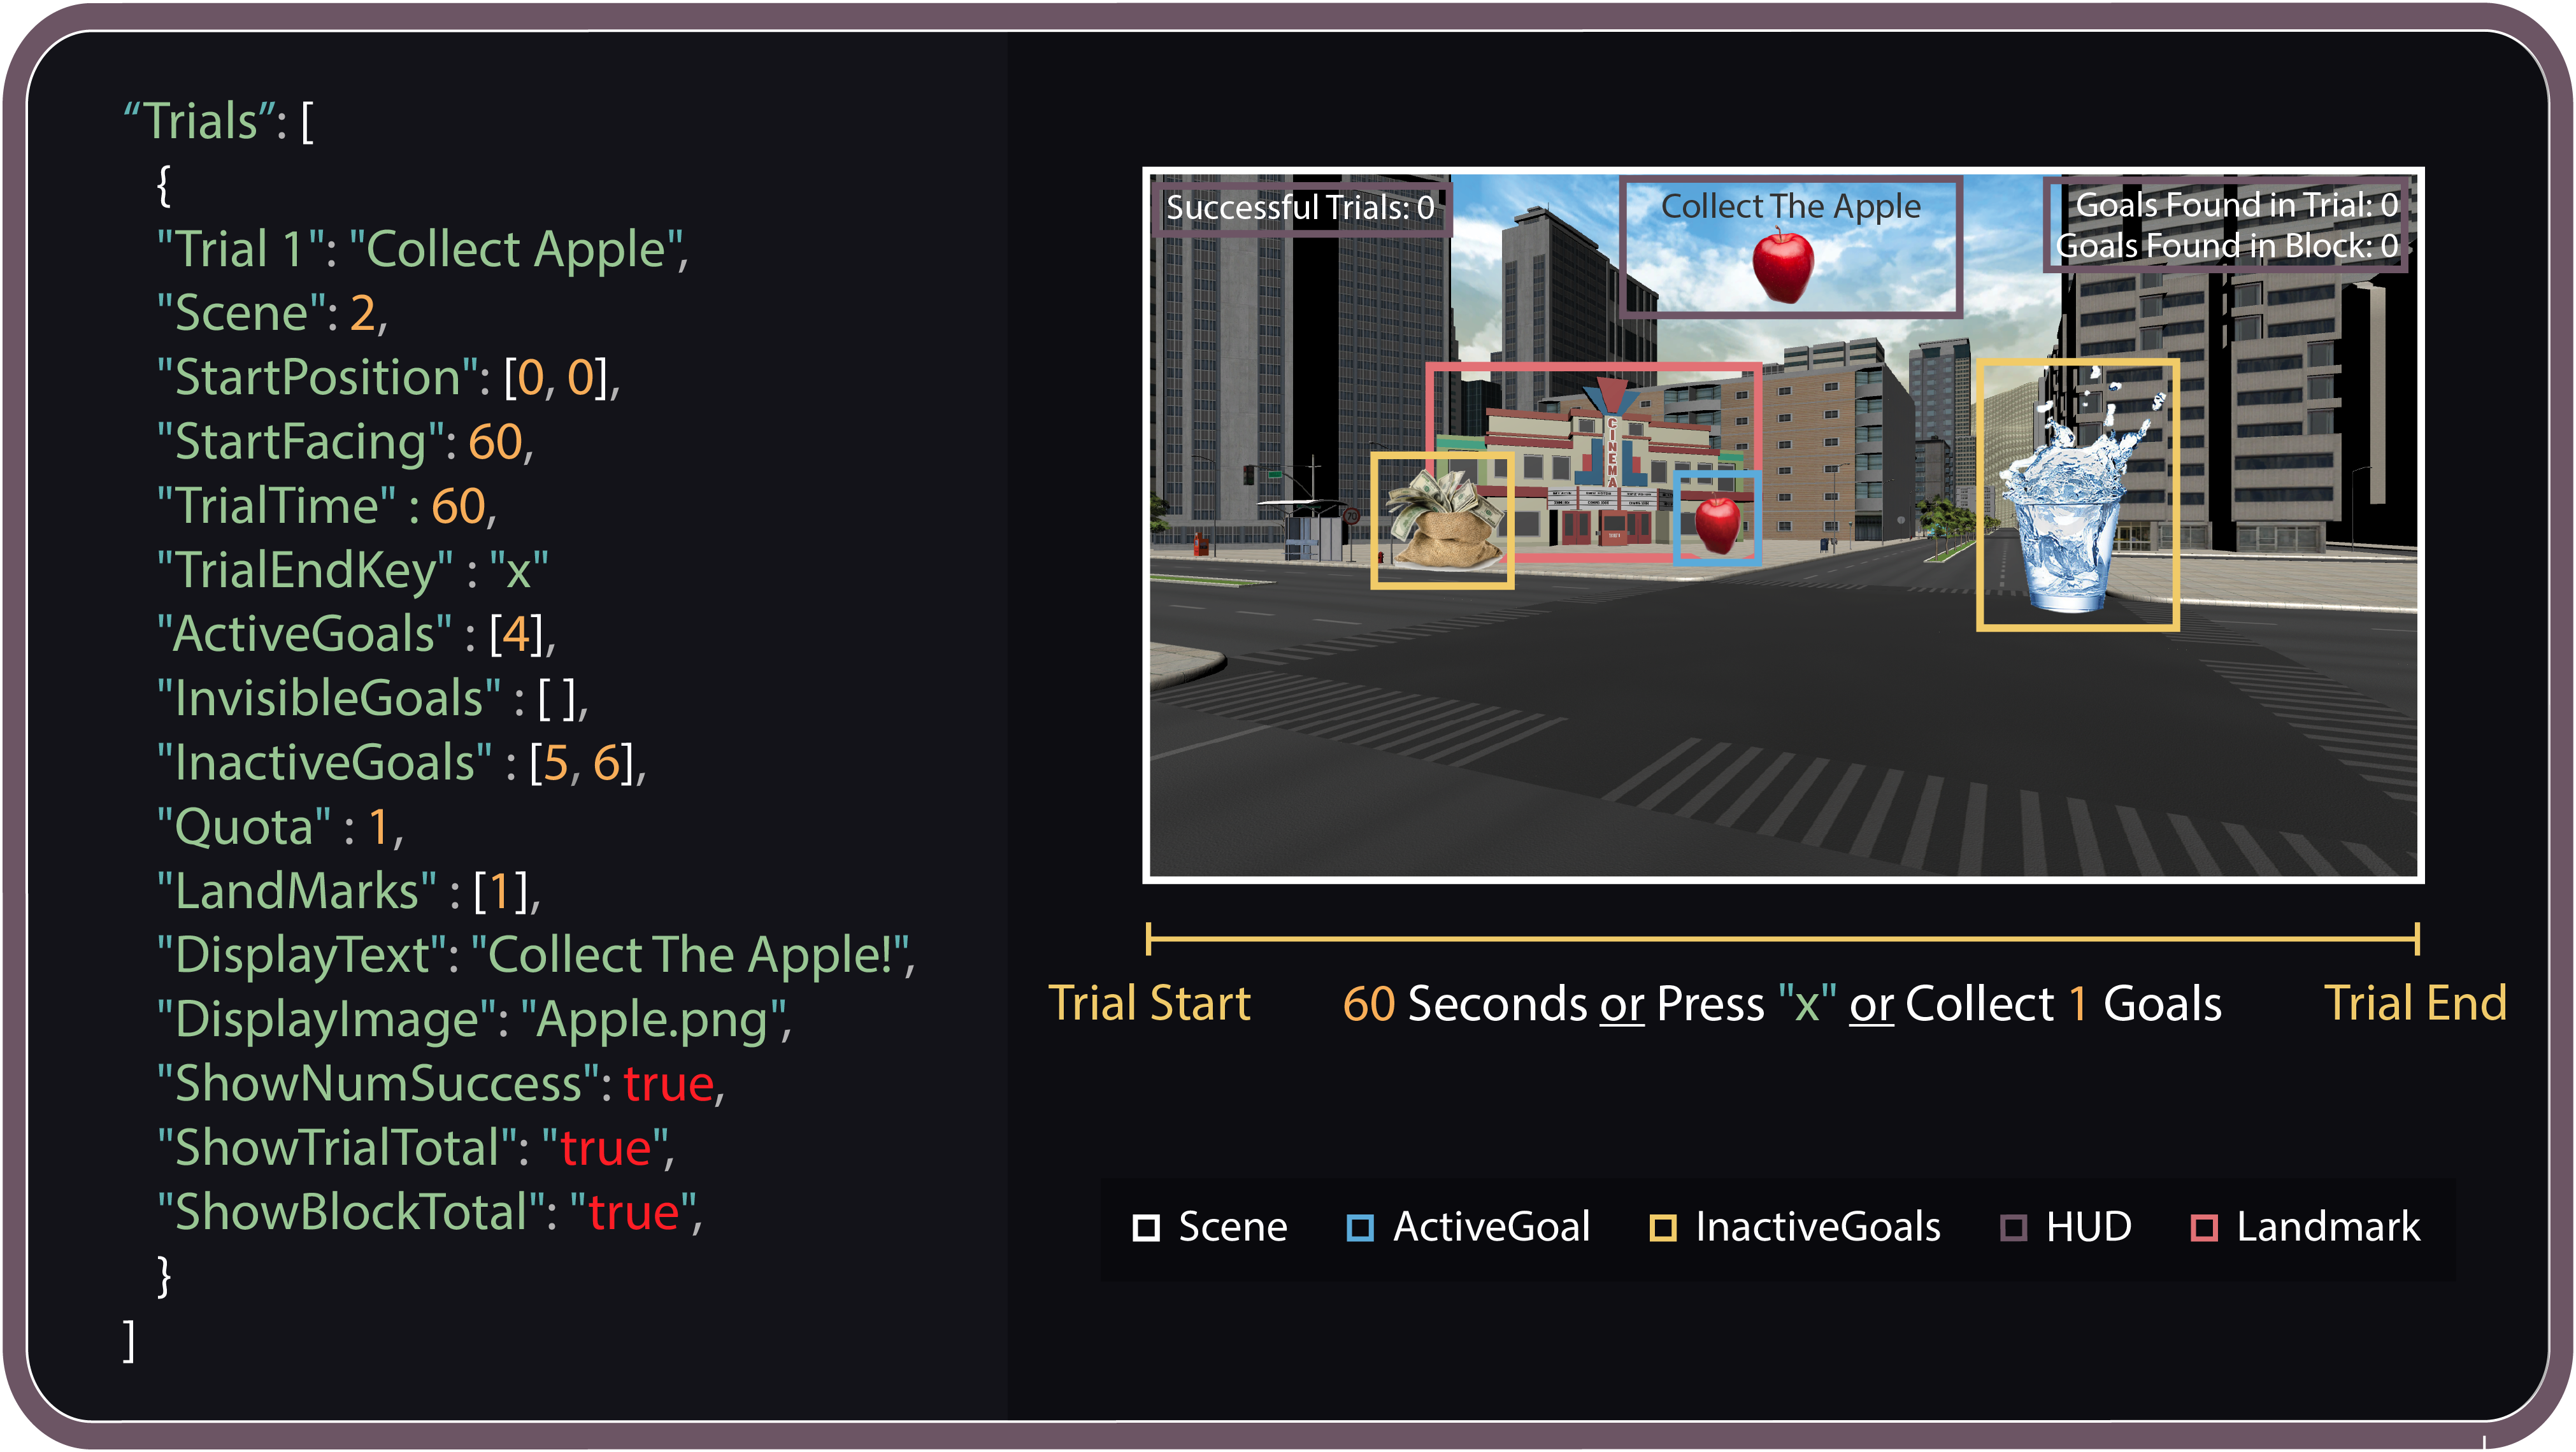
Each Task Trial allows you to create a unique navigation environment and task demand by outfitting one of your Scenes with any number of Goals and/or Landmarks, and, perhaps, an Enclosure.
Trial Indexing
Both Task Trials and Instruction/Cue Screen Trials are defined within the Trials section of the Configuration File. Each Trial, regardless of its type, is implicitly assigned an index number based on the order that it is defined within the Trials section starting at 1.
Creating a Task Trial
We recommend copying and pasting a Task Trial definition from the Configuration File template and simply customizing the Attribute-Value Pairs to suit your needs.
Step 2: Add a reference Attribute-Value Pair
We recommend including an Attribute-Value Pair in the form: “Trial #”: “Description”. The "#" corresponds to the Trial's index number which will be used when creating Blocks and "Description" can be replaced with identifying information of your choosing.
Step 3: Select a Scene
Set the Value of the Scene Attribute to the Scene Number of the Scene you want the Task Trial to take place in.
Step 4: Participant Placement
Use the StartPosition Attribute to dictate the participant's x,z Position Values and the StartFacing Attribute to dictate the participant's Rotation about the y-axis.
Step 5: Trial Termination
The TrialTime dictates the duration of the Task Trial (in seconds). Additionally, a Unity API KeyCode can be used as the Value for the TrialEndKey Attribute, and when pressed the Task Trial will terminate.
Note: The remaining steps are all optional. Task Trial can be created without Goals, Landmarks, or an Enclosure allowing the participant to navigate the 3D environment contained within the Scene.
Step 6: Adding Goals
A Goal can be added to a Scene by including its index number in either the ActiveGoals, InvisibleGoals, or InactiveGoals Attribute lists.
Note: Each Goal can only appear in one Attribute list per Task Trial.
When a Goal index is added to the ActiveGoals Attribute list, it will be visible to the participant. Upon collision, the Goal will be removed, the Goal Sound will play, and it will be counted toward the Quota.
Invisible Goals
When a Goal index is added to the InvisibleGoals Attribute list, it will not be visible to the participant. Upon collision, the Goal will be removed, the Goal Sound will play, and it will be counted toward the Quota.
Inactive Goals
When a Goal index is added to the InactiveGoals Attribute list, it will be visible to the participant. However, upon collision, the Goal will not be removed, the Goal Sound will not play, and it will not be counted toward the Quota.
The Quota Attribute-Value Pair prescribes the number of Active and/or Invisible Goals that must be collected (collided with) by the participant to terminate the Trial. If the Quota is not reached by the end of the prescribed TrialTime, the Task Trial will automatically terminate. If the Quota Attribute-Value Pair is not included, the Task Trial will terminate upon collecting a single Goal.
Note: When a participant reaches the Quota, the Task Trial is recorded as a success by OpenMaze. Task Trial successes can be used to create a performance criterion (see Blocks).
Step 8. Adding Landmarks
Landmark indices included in the Landmarks Attribute list will be placed into the Scene as solid objects, such that participants will not be able to move through them.
Step 9. Adding Enclosures
An Enclosure can be added to the Scene by including the Enclosure Attribute and assigning it an Enclosure index number.
Step 10. Adding Heads Up Display (HUD) Information
HUD Attribute-Value Pairs can be added to any Task Trial allowing you to display information to participants as they complete the Task Trial. HUD options can be used to display custom text, Image Files, and performance metrics including the number of Goals collected in the current Task Trial and/or Block, and the number of successful Task Trials completed in the current Block.
Task Trial Example
Task Trial Attribute-Value Pairs
| Attribute | Example Value | Description |
|---|---|---|
| Trial # | “Description” | Can be added to keep track of indices and used as a reference when creating Blocks. |
| Scene | 3 | Value is set to a Scene Number. Scene Numbers can be found beside the Scene name in the Unity Editor Build Settings window. |
| StartPosition | [0,0] | Defines the [x,z] coordinates of the participant's Position Component within the Scene when the Task Trial begins. |
| StartFacing | 60 | Defines the y value of the participant's Rotation Component, dictating the angle that the participant will be facing within the Scene when the Task Trial begins. |
| TrialTime | 60 | Length of Trial in seconds. Trial will time out if Quota is not met and TrialEndKey is not pressed. Upon timeout, the experiment will proceed to the next Trial as defined in the Block section. |
| TrialEndKey | “Space” | Unity API key code. When pressed the Trial will terminate. |
| ActiveGoals | [1,3,...] | Numbers in this list correspond to the indices of Goals. Goals included in this list will be visible to the participant and will be collected when collided with. |
| InactiveGoals | [1,3,...] | Numbers in this list correspond to the indices of Goals. Goals included in this list will be visible to the participant but cannot be collected. |
| InvisibleGoals | [1,3,...] | Numbers in this list correspond to the indices of Goals. Goals in this list will be collected when collided with, however, they will not be visible to the participant. |
| Quota | 5 | The number of Active and/or Invisible Goals that must be collected to trigger the termination of the Trial. |
| Landmarks | [1,3,...] | Numbers in this list correspond to the indices of Landmarks. Landmarks included in this list will be added to the Scene. |
| Enclosure | 1 | Allows you to add an Enclosure to the Scene. The value corresponds to the Enclosure's index number. |
| DisplayText | “Display This Text” | The string provided will be displayed at the top of the screen for the duration of the Task Trial. |
| DisplayImage | “Image.png” | The name of the Image File as it appears in the 2D_Object folder. Image Files contained in subfolders can be used by including the directory extension (e.g., subfoldername/Image.png). File extensions (e.g., .png, .jpg) must be included. The Image File will be displayed at the top of the screen for the duration of the Task Trial. |
| ShowTrialTotal | true | When set to true the number of Goals collected in the current Task Trial will be displayed for the duration of the Task Trial. |
| ShowBlockTotal | true | When set to true the number of Goals collected in the current Block will be displayed for the duration of the Task Trial. |
| ShowNumSuccesses | true | When set to true the number of successful Task Trials in the current Block will be displayed for the duration of the Task Trial (a Task Trial is successful when a participant meets the Quota). |
Experiment Design Ideas
Task Trials can accommodate a HUGE variety of experiment designs. Below we review just some of the designs that we have thought of. Can you think of others?
Using Goals
Include Goals in the ActiveGoals list during the learning phase to teach object-location associations. Include the same Goals in the InvisibleGoals list during the test phase to assess the participant's memory for the object-location associations.
Place an Invisible Goal at the location the participant is instructed to navigate to. When the destination is reached the Trial will terminate.
Item distributions can be created using a single 3D Model or Image File to define multiple Goals with different Transform Values. This will allow the same 3D Model or Image File to be instantiated in different locations within the same Scene during the same Trial, or across multiple Trials. Use invisible Goals to teach participants invisible reward zones via audio feedback only.
Place multiple Goals into a Scene to assess, for example, foraging behavior or multi-option decision making.
Place Inactive Goals alongside Active Goals to act as lures.
Using Landmarks
Add, remove, or exchange Landmarks to manipulate contextual cues during different phases of the experiment.
Include Landmarks to guide the participant along a specified route during the learning phase, then exclude them in later phases of the experiment.
Custom mazes
Custom 3D Model mazes (e.g., t-mazes, radial mazes) can be created in the Unity Editor, or third-party software, and then defined as Landmarks, allowing them to be instantiated into any Scene on a trial-by-trial basis.
Landmark Tip: Download the free ProBuilder tool from the Unity Asset Store to easily create custom mazes and other 3D Models. After creating the 3D Model, define it as a Landmark and use it on a trial-by-trial basis.
Invisible cuboids may also be defined as Landmarks and placed into a Scene to act as invisible barricades. This can be used to restrict access to certain sections of the environment from one Trial to the next.
Using Enclosures
Enclosures allow you to quickly create any number of open field maze tasks within any Scene.
Enclosures allow the features of the movement area to be manipulated while the Scene environment remains fixed or vice versa.
Enclosure customization allows for parametric morphing between two end points (e.g., from a square Enclosure to circular Enclosure); a technique that has proven fruitful when applied to rodents.
When using an Enclosure the StartPosition list can be left empty and the StartFacing Value can be set to -1. This will result in the participant being placed at a random location and facing a random direction within the Enclosure.
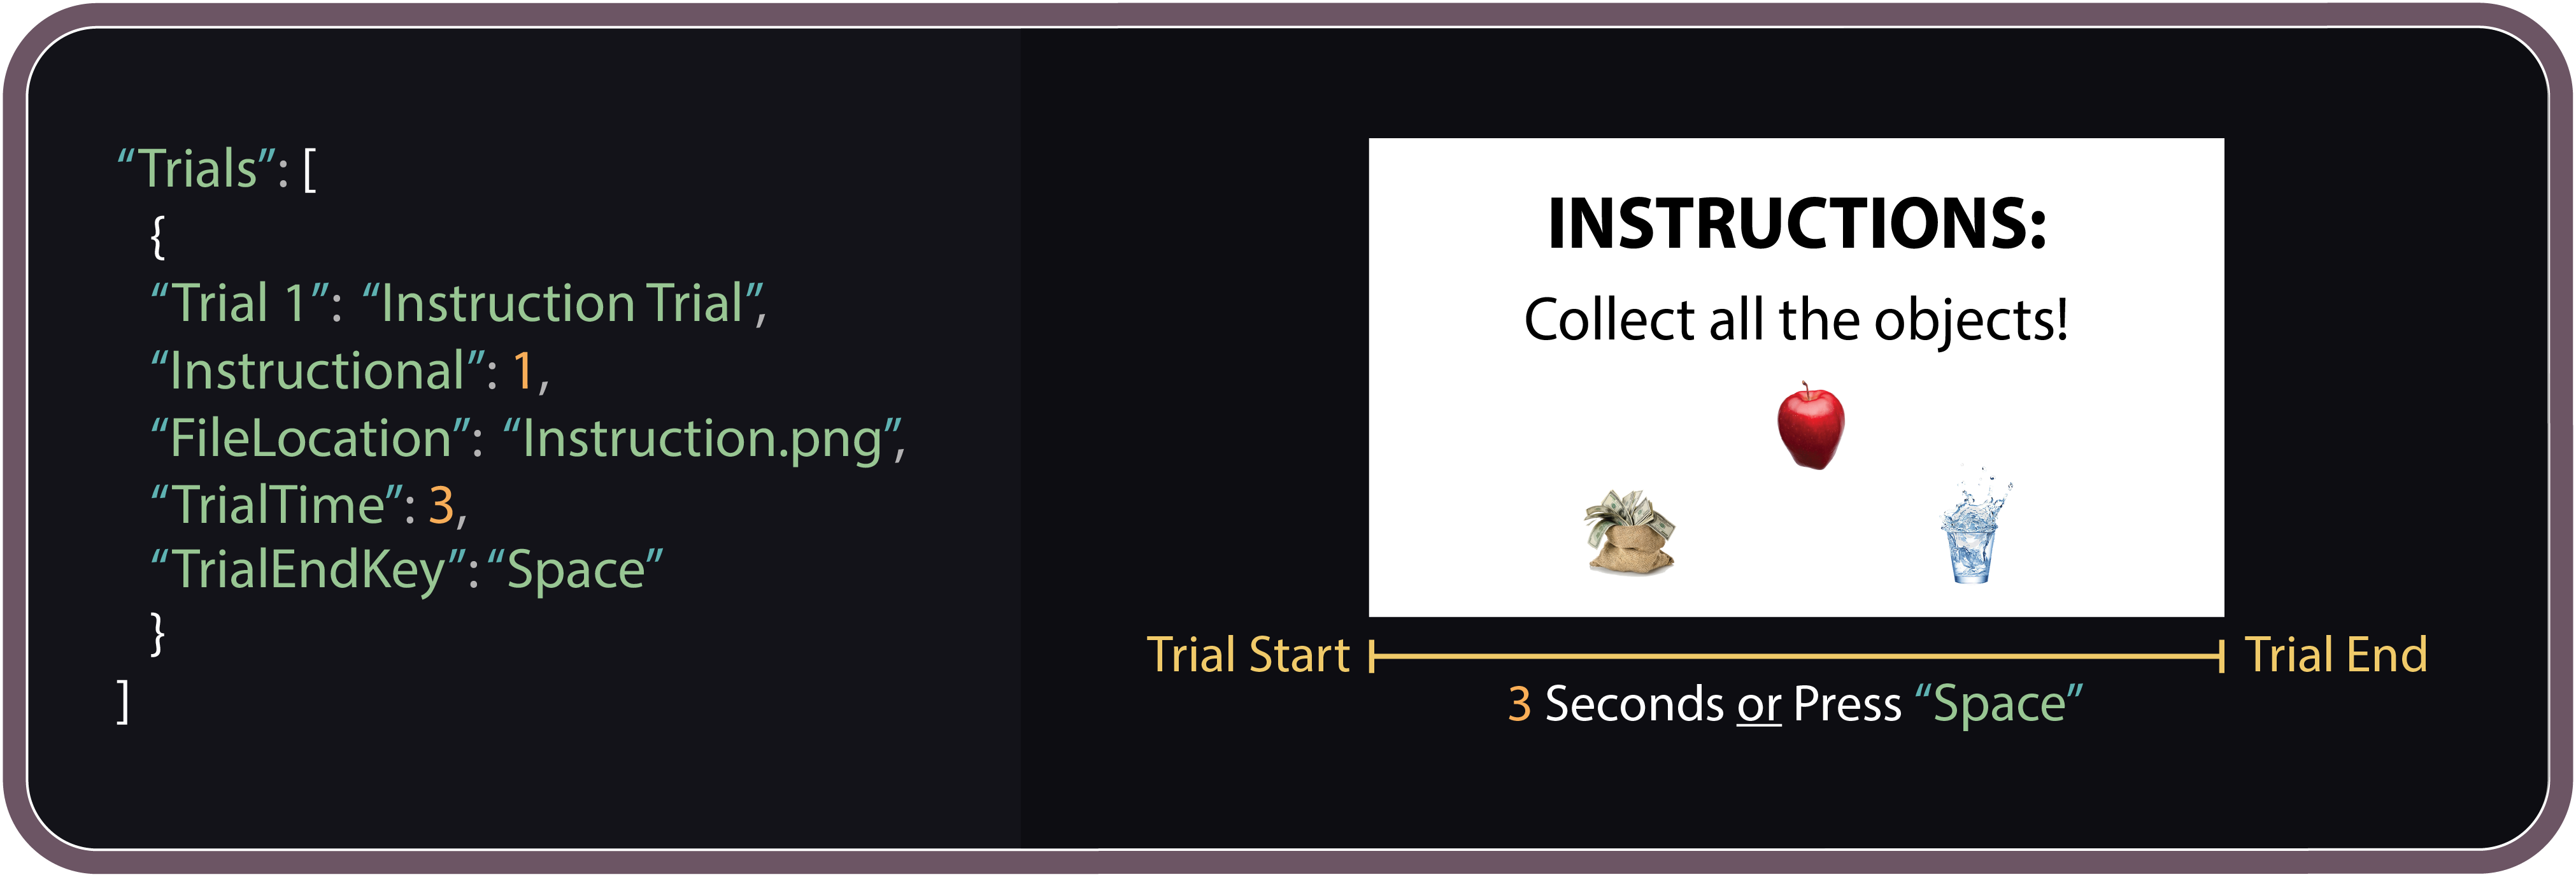
Instruction/Cue Screen Trials
Instruction/Cue Screen Trials are used to present Image Files to participants, allowing you to create custom instruction and cue screens for your experiment. Image Files must first be placed into the 2D_Objects folder:
Assets/StreamingAssets/2D_Objects
Tip: Create Image Files for Instruction/Cue Screen Trials by using a presentation software program (e.g., PowerPoint, KeyNote). You can then export your slides as individual Image Files.
Creating Instruction/Cue Screen Trials
We recommend copying and pasting an Instruction/Cue Screen Trial from the Configuration File template and simply customizing the Attribute-Value Pairs to suit your needs.
Step 2: Add Index/Description
We recommend including a description Attribute-Value Pair in the form: “Trial #”: “Description”. The "#" corresponds to the Trial's index number which will be used when creating Blocks and "Description" can be replaced with identifying information of your choosing.
Step 3: Assign an Image File
Set the Value of the FileLocation Attribute to the name of the Image File you wish to use. File extensions (e.g., .png, .jpg) must be included in the file name.
Step 4: Set the presentation time
Set the Value of the TrialTime Attribute to the length (in seconds) that the Image File should be displayed for. When set to -1 the TrialEndKey must be pressed to proceed.
Step 5: Assign a Termination Key
Assign a Unity API KeyCode code to the TrialEndKey Attribute; when pressed the Trial will terminate.
Step 6: Adding an end experiment button
The EndButton Attribute can be added to any Instruction/Cue Screen Trial and setting its Value to true will add a button labeled End Experiment to the screen. When pressed the experiment application will close. We discuss this option in more detail in the Online Experiments section below.
Instruction/Cue Screen Configuration File Example
Instruction/Cue Screen Trials Attribute-Values
| Attribute | Example Value | Description |
|---|---|---|
| Trial # | “Description” | Can be added to keep track of indices and used as a reference when creating Blocks. |
| Instructional | 1 | Must be set to 1 for Instruction/Cue Screen Trials. |
| FileLocation | "Image.png" | Value is set to the Image File name. Subfolders can be used by include the directory extension (e.g., subfoldername/Apple.png). File extensions (e.g., .png, .jpg) must be included in the file name. |
| TrialEndKey | “Space” | Unity API key code. When the defined key is pressed the experiment will proceed to the next Trial as defined in the Block section. |
| TrialTime | 60 | Length of the Trial in seconds. When set to -1 the TrialEndKey must be pressed. |
| EndButton | true | When set to true a button labeled End Experiment is added to the screen. When pressed the experiment application will close (only works when running a Built Application). |
Blocks
Blocks are used to create Trial presentation sequences. Blocks allow Trials to be presented in a serial or randomized order and can be used to create performance criterion for participants.
Tip: Use Blocks to divide your experiment into analysis chunks. You can then use the BlockIndex column in the output file to segment the data during analysis.
Creating a New Block
You will find examples of each type of Block described below in the Configuration template. We recommend simply copying the Block type you require and customizing it to suit your needs. We also recommend adding a "Block #": "Description" Attribute-Value Pair to every Block. The "#" corresponds to the Block's index number and the "Description" can be replaced with identifying information of your choosing.
Presenting Trials in Serial Order
A Block, in its most basic form, only requires the TrialOrder Attribute-Value Pair. The TrialOrder Attribute is defined by an ordered list of Trial indices. When the Block is executed it will display Trials in the order they are defined. Upon termination of the last Trial, the Block will also terminate, and the next Block in the BlockOrder list will begin.
Presenting Trials in Random Order
The RandomlySelect Attribute-Value Pair
- To present Trials in random orders, you can add the RandomlySelect Attribute-Value Pair to any Block.
- The RandomlySelect Attribute is defined by a list of Trial index Orders.
- When the RandomlySelect Attribute-Value Pair is added to a Block, the Trial Index 0 (zero) can be used in the TrialOrder Attribute list.
- When the Block executes the Trial index 0 (zero), the Block will randomly select an Order from the RandomlySelect Attribute list.
- The Block will execute each of the Trials contained within the selected Order, in the order they are defined.
- Upon termination of the last Trial contained in the selected Order, the Block will return to the TrialOrder list and execute the next Trial.
The Replacement Attribute-Value Pair
IMPORTANT! When the Replacement Attribute is set to 0 (zero), the number of 0 (zero) indices contained in the TrialOrder Attribute-Value Pair cannot exceed the number of Orders defined in the RandomlySelect Attribute-Value Pair.
Adding Task Criterion
During the execution of a Block, several performance values are tracked allowing functions to be added to a Block to create performance criterion. Functions can be added to Blocks by assigning their name to the TrialFunction and/or BlockFunction Attribute and, optionally, arguments can be passed to them using the TrialGoal Attribute (used by the TrialFunction), or the BlockGoal Attribute (used by the BlockFunction). A criterion is met when the function returns true.
Trial Criterion
When a function is added using the TrialFunction Attribute, the function will be called after each Task Trial in the Block. If false is returned the Block will continue to the next trial as usual. If true is returned the Block will terminate and the experiment will proceed to the next Block in the BlockList.
Block Criterion
When a function is added using the BlockFunction Attribute, the function will be called only after the very last Trial in the Block. If false is returned all performance metrics will be reset and the Block will be repeated. When true is returned by the function the Block will terminate, and the experiment will proceed to the next Block in the BlockList.
Block AND Trial Criterion
Importantly, the TrialFunction and BlockFunction can be added to the same Block. This allows Blocks to terminate early if the criterion has been met (TrialFunction) and repeat if the criterion is not met by the end of the Block (BlockFunction).
The Built-in SuccessesCriterion Function
OpenMaze comes with a built-in function named SuccessesCriterion which checks to see whether a certain number of Task Trials have been completed successfully (Task Trials are counted as successful if the Quota is reached). The number of successful Task Trials that must be reached is passed to the function using the TrialGoal Attribute (when using the TrialFunction Attribute) or the BlockGoal Attribute (when using the BlockFunction Attribute). When the participant has successfully completed the number of Task Trials the function will return true.
Creating Custom Functions
Custom functions can be created within the Functions.cs script found in the OpenMaze source code folder: Assets/Scripts/Main. Functions must be written in C# and may only return true or false.
Tip: If you are unfamiliar with C#, you can use the SuccessesCriterion function already contained in the Function.cs script as a template for creating your own function(s).
Block Order
Once the experiment Blocks have been created, their order of execution is defined by the BlockOrder Attribute which is itself defined by an ordered list of Block indices. Blocks can be executed multiple times and in any order.
Blocks Configuration File Example

Blocks Attribute-Value Pairs
| Attribute | Example Value | Description |
|---|---|---|
| BlockOrder | [1,2,2,...] | Dictates the order in which Blocks will be presented when the experiment is launched. Each number in this list corresponds to the index of a Block. Blocks can be presented in any order and called multiple times within the BlockOrder list. |
| Block # | “Description” | Can be added to keep track of indices and used as a reference when creating the BlockOrder. |
| TrialOrder | [1,4,5,5,...] | An ordered list of Trial indices. Trials can be presented in any order and called multiple times within the TrialOrder list. |
| Replacement | 0 or 1 | Random selection is executed with replacement (1) or without replacement (0). |
| RandomlySelect | [{“Order”: [1,2]}, …, {“Order”: [3,4]}] | A list of Trial Orders. When the Trial index 0 is encountered in the TrialOrder, one of the Order lists will be randomly selected. When an Order is selected, Trials are presented in the order they are defined in the Order list. |
| Order | [1,4,5,...] | An ordered list of Trial indices. Each list must contain at least 1 Trial, with no upper limit. |
| TrialFunction | "SuccessCriterion" | Refers to the name of a function written in the Functions.cs script of the OpenMaze source code. The function will be called at the end of each Trial to determine whether the Block should be terminated or continue. |
| TrialGoal | "5" | Contains any variables needed to run the Block Function. |
| BlockFunction | "SuccessCriterion" | Refers to the name of a function written in the Functions.cs script of the OpenMaze source code. The function will be called at the end of each the Block to determine whether the Block should be terminated or repeated. |
| BlockGoal | "3" | Contains any variables needed to run the Block Function. |
| DisplayText | “Display This Text” | The string provided will be displayed at the top of the screen during each Task Trial in the Block. |
| ShowTrialTotal | true | When set to true the number of Goals collected in the current Trial will be displayed. |
| ShowBlockTotal | true | When set to true the number of Goals collected in the current Block will be displayed during every Task Trial in the Block. |
| ShowNumSuccesses | true | When set to true the number of successful Task Trials in the current Block will be displayed during every Task Trial in the Block (a Task Trial is successful when a participant meets the Quota). |
Settings
The Settings Section can be divided into two sections: Experiment Settings and Character Settings.
Experiment Settings
Experiment Settings provide a small number of Attribute-Value Pairs that can be used to change data recording frequency, ignore input from the user upon Trial onset, and turn on/off timing analysis features.
Experiment Settings
| Attribute | Example Value | Description |
|---|---|---|
| OutputTimesPerSecond: | 30 | Used to adjust how often per second the experiment records a new line of data to the output file. Output is intrinsically linked to the Unity software Update() function which is itself intrinsically linked to the refresh rate of the monitor running the experiment (see Output Timing). This number can be used to reduce the output rate below the update cycle rate, but not above. |
| IgnoreUserInputDelay | 0.5 | Time in seconds after each Trial onset that input will be ignored. We recommend using a 1 second delay to ensure that accidental key presses do not cause Trials to be skipped when consecutive Trials use the same TrialEndKey. |
| TimingVerification | true | When set to true, a small box will be added to the bottom corner of the experiment which will alternate between white and black upon Trial onsets. Using a photodiode, experimenters can compare visual onset to the onset time recorded in the output file (see Output Timing). |
Character Settings
The Character Settings Attribute-Value Pairs are contained within the CharacterSettings Object. They can be used to make quick changes to how the participant navigates the environment.
Character Settings
| Attribute | Example Value | Description |
|---|---|---|
| Height | 2 | The height of the participant's viewpoint within the environment. |
| MovementSpeed | 5 | How fast the participant moves within the environment when pressing the forward and backward movement input keys. |
| RotationSpeed | 75 | How fast the participant rotates within the environment when pressing the left and right rotation input keys. |
| DistancePickup | 2 | Can be used for Task Trials that place participants randomly within an Enclosure. This will ensure that the participant is placed no closer to a Goal than the distance defined. |
| GoalRotationSpeed | 0 | When 3D Model Goals are placed into a Scene, they will rotate 360 degrees per the value of time (in seconds) defined. When set to 0 (zero) 3D Model Goals will not rotate. |
Testing Experiments
Running Configuration Files
Method 1: Manually Select
By default, OpenMaze will prompt you with a file browser each time the experiment is launched. This is true regardless of whether the experiment is launched in the Unity Editor or as an experiment application. Simply navigate to the folder where your Configuration File is saved, select it, and click Open.
Method 2: AutoRun
You can have OpenMaze automatically execute a specific Configuration File by moving the AutoRun_Config folder from the Configuration_Files folder to the StreamingAssets folder. The placeholder Configuration File contained in the AutoRun_Config folder can be used to make sure you have moved the folder to the proper location, before being replaced with a Configuration File of your choosing. Removing the AutoRun_Config folder from the StreamingAssets folder OR removing all the Configuration Files from the AutoRun_Config folder will allow you to manually select Configuration Files once again.
IMPORTANT! After moving the AutoRun_Config folder to the StreamingAssets folder it cannot be renamed, and it must contain only 1 Configuration File.
Testing Experiments in the Unity Editor
Experiments can be launched directly within the Unity Editor, allowing you to make sure everything is running properly before you export it as an application. To launch an experiment in the Unity Editor, follow these steps:
We recommend adding a JSON linter to your text editor which will allow you to verify whether your Configuration File is a valid JSON file via a menu option or a hot-key combination. You can also copy your entire Configuration File and paste it into an online linter like https://jsonlint.com/.
Step 2: Save your changes
This sounds silly, but while testing your experiment you are likely to find yourself making small changes to the Configuration File before returning quickly to the Unity Editor to test them. CTRL+S is your friend!
Step 3: Open the +LaunchExperiment Scene in the Unity Editor
The experiment will not run if you have any other Scene open in the Unity Editor.
Step 4: Press the Play button
Pressing the Play button while the +Launch Experiment Scene is selected will launch the experiment in the Unity Editor.
Step 5: Select a Configuration File
Upon launching the experiment, you will be prompted with a Choose Configuration File window. Select the Configuration File you wish to test and press the Open button.
Note: If you are using the AutoRun Configuration File method described above, the AutoRun Configuration File will be automatically executed.
Step 6. Start the Experiment
Navigate to the Game window and press the Start Experiment button. The experiment Configuration File will now be executed in the Game window and you may complete the experiment exactly as a participant would.
Tip: Click the Maximize On Play button in the top right of the Game window to experience the experiment in fullscreen.
Step 7. End Testing
Stop the experiment at any time by pressing the Play button once again.
Making Real-Time Changes
While an experiment Configuration File is being executed in the Game window, changes to the current Trial environment can be made within the Scene window. This allows the changes to be witnessed from the participant perspective in the Game window in real-time. This can prove extremely helpful when trying to make minor tweaks to the environment. You can also pause the experiment at any time, allowing you to make changes without having to worry about the Trial timing out.
Testing a Trial or Block
While specific Trials and Blocks cannot be selected for testing within a Configuration File, Configuration Files can be temporally edited so that specific events occur at the beginning of an experiment to facilitate the process. Specifically, you can add a Block index to the front of the BlockOrder or move a Trial index to the front of the TrialOrder within the first Block in the BlockOrder.
Troubleshooting
If you run into any issues while running your experiment, try the following in the order they are prescribed:
Most commonly, if you encounter an unexpected error when attempting to run a Configuration File, it is likely a JSON formatting issue. Because of this we always recommend using a text editor with a JSON lint tool. This will allow you to press a hot key to check if your Configuration File has any issues. Alternatively, while much more tedious, you can copy and paste your JSON file text into an online JSON lint (e.g., https://jsonlint.com/).
Check for error messages
Open the Console window within the Unity Editor and see if it displays any error messages. We have tried our best to create custom error messages for the most common errors that you may encounter when running an experiment. These messages will alert you to many issues. Some examples include attempting to call an object that has not been placed into the correct project folder, calling a Scene number that hasn’t been added to the Build, and many others.
Reach out to the OpenMaze team
If you are having an issue that you cannot resolve, please feel free to contact us directly with your issue. You can get in touch with us via our website Contact page or GitHub.
Exporting Experiments
Experiment Applications
While you can run your experiments through the Unity Editor, it is not recommended due to how computationally expensive it is, and because it requires the Unity Editor to be installed on all testing computers. Instead, once you have created and tested your experiment in the Unity Editor, it can be built into an application that can run independent of any software (including the Unity Editor).
The Unity Editor allows you to build your experiment application for a variety of platforms, regardless of the platform you have been using to design the experiment. This allows you to, for example, code the experiment using a Windows device and export it as an application that can be run on macOS, or vice-versa.
Platform Support
At this time, OpenMaze experiment applications have been extensively tested on the macOS and Windows operating systems. However, you should be aware that Unity software supports a variety of additional build platforms. These include: iOS, Android, WebGL, PlayStation 4, PlayStation Vita, Xbox One, Wii U, 3DS, Oculus Rift, Google Cardboard, SteamVR, PlayStation VR, Gear VR, Windows Mixed Reality, Daydream, Android TV, Samsung Smart TV, tvOS, Nintendo Switch, Fire OS, Facebook Gameroom, Apple's ARKit, Google's ARCore, and Vuforia. We expect that exporting OpenMaze experiments for any of the untested platforms may require changes to the Unity Editor Project Settings or perhaps the OpenMaze codebase.
Building an Application
Check that the Build Support for your Target Platform has been installed. To do this, open the Unity Hub application and click on the Installs tab. If installed, the icon of the Target Platform will appear in the box labelled with the Unity software install version you have used to code your experiment. If the Target Platform icon is not present, click the three dots ⋮ located in the top right corner of the box and click Add Modules. When prompted, select your Target Platform, and click Next.
Step 2: Create an empty folder
Create an empty folder within the directory you would like to save your application (you can name it whatever you would like). This will be used to store your experiment application and the other folders necessary for running the application.
Step 3: Open the Build Settings
Click the File tab at the top of the Unity Editor and select Build Settings.
Step 4: Select the Target Platform
Select the platform you intend to run the built application on (, Windows, Mac OS X) from the Target Platform drop-down menu in the Build Settings window. If your desired Target Platform does not appear in the drop-down menu refer to Step 1.
Step 5: Build the application
Click the Build button and select the folder you created in Step 2.
Note: You may be prompted with a Missing Project ID window. Click Yes to continue.
Step 6: Add Configuration Files
Built applications will not contain the Configuration_Files folder. Placing the Configuration_Files folder in the folder containing the experiment application will ensure that it is prompted when the application is launched.
Note: If you built your application using an AutoRun Configuration File, the application will automatically run this Configuration File.
Running Applications
Applications must be run on a device with the same Target Platform that was selected when it was built. Upon launching the application, it will be displayed fullscreen and will run exactly as it did in the Game window within the Unity Editor.
IMPORTANT! You must place the Configuration_File folder into the same folder as the application for it to auto prompt. If you are using an AutoRun Configuration File you can replace or make changes to it by navigating to the StreamingAssets subfolder.
Step 2: Check output
After running the experiment, navigate back to the folder containing the application. There should now be a folder named Assets that was not there prior to launching the experiment the first time. Within this folder is a subfolder named Outputfiles~. This folder will store data files every time the application is run.
Post Build Changes
Once your experiment has been built, it is possible to make changes directly to the application. However, other changes must be done in the Unity Editor and will require a new application to be built.
Things You Can Do
Changes can be made to any files that are contained within the StreamingAssets folder which is exported with your experiment and can be found in the following directory of your experiment application folder:
Windows Applications
Application/OpenMaze_Data/
StreamingAssets
macOS Applications
Application/Contents/Resources/
Data/StreamingAssets
This provides access to the 2D_Objects folder, allowing you to add or make changes to Instruction/Cue Screen Trials, and/or Image File Goals and Landmarks. It also provides access to the AutoRun_Config folder, if one existed at the time the application was built. This makes it possible to replace or make changes to AutoRun Configuration Files. Further, adding or removing the AutoRun_Config folder will change the application from manual to automatic (or vice versa) Configuration File execution.
Things You Can Not Do
Once built, changes to Scenes, 3D Models, and Audio Files cannot be made. So, while changing and/or creating new Configuration Files is possible, Configuration Files can only reference Scenes, 3D Models, and/or Audio Files that were present within the project at the time the application was built.
Sharing Applications
Exporting your experiment as an application makes it easy to share with friends, colleagues and even participants (see Online Experiments). Due to their file size, we recommend using a cloud service (e.g., Dropbox, Google Drive). Windows application folders can be uploaded in their full form or as a zip file. macOS applications however must be converted into a Disk Image (.dmg file type) and the Disk Image must be uploaded and downloaded. We provide detailed instructions for this procedure in the Online Experiments section below.
Output Data
Data Files
OpenMaze output is written to Comma Separated Values (.csv) files. Each time the experiment is executed a .csv file is created and named with the concatenated text entered in the experiment start screen (i.e. +Launch Experiment Scene) fields (SF) and a time stamp:
SF1_SF2_SF3_SF4_TimeStamp.csv
Output files record the participant's position (x, y, and z) and viewing angle (y rotation value), Goal collisions, and keystrokes. Each row also includes the Block and Trial index, as well as a Trial sequence number identifying how many Trials have occurred in the Block. Rows are also timestamped with the absolute system time of the device running the experiment.
Customizing StartFields
You may wish to change the placeholder text for your StartFields, perhaps to "Participant ID", "Session #", "Condition", "Version", etc. This can be done within the Unity Editor before exporting your experiment (these fields cannot be changed after the experiment has been built).
Open the +Launch Experiment Scene in the Unity Editor, navigate to the Hierarchy window and click to expand the Canvas.
Step 2. Select the field
Contained within the Canvas are 4 Field objects that can be expanded to reveal Text and Placeholder; select Placeholder.
Step 3. Change the placeholder text
With the Placeholder object selected navigate to the Inspector window where you can change the text element to suit your needs.
Tip: To disable any of the StartFields, navigate to the Hierarchy window and click the Canvas GameObject to expand it. Click the Field with the number that corresponds to the StartField you wish to disable. Uncheck the checkbox next to the field name at the top of the Inspector window. Any StartField disabled in this manner will be removed from your +Launch Experiment scene but will still be available in the Hierarchy window under the Canvas GameObject should you wish to reenable it.
Output Timing
Participant Position Data
The Position of the participant is recorded each time the Unity Update() function is called. By default, Unity software uses VSync, which syncs the Update() function with the framerate of the monitor displaying the experiment. This ensures the output is synced as closely as possible to the participant’s experience.
Goal Collisions
Collision data is recorded by the Unity FixedUpdate() function which is called every 20ms and is responsible for detecting and responding to collisions between GameObjects. This allows collisions to be marked in the output file at the same time Unity itself responds to them.Controls and Input Devices
Movement Controls
By default, OpenMaze is calibrated for use with the arrow keys of a standard keyboard, or a single joystick, allowing participants to move forward and backward and rotate in place left or right. However, controls can be easily changed through the Unity Editor's Input Options to include more complex movement controls: for example, allowing up/down/left/right head movement to be controlled with the mouse or a second joystick (e.g., gamepads with two joysticks).
Input Devices
OpenMaze can be run using typical digital (e.g., keyboards, digital controllers) or analog (e.g., joysticks, gamepads) devices supported by the local machine. The input device can be set within the Unity Editor's Project windows and input can be reassigned to different keys if necessary (e.g., when using MR-compatible devices). While not explicitly supported by OpenMaze, Unity software is compatible with a variety of specialized input devices (e.g., VR headsets, touch screens) through add-on support packages. Notably, augmented versions of OpenMaze have been successfully used with the Oculus Rift headset.
Online Experiments
Uploading and Downloading
OpenMaze has been designed to make it easy to upload and download applications across devices. This functionality allows experiments to be shared with participants online. We have created two short video tutorials that provide step-by-step instructions on how to package your experiments, upload them to the cloud, and create a URL that can be used by anyone to download your experiment. They also include instructions for how to download applications using the URL, unpack them, and run them.
IMPORTANT! There are key differences between uploading and downloading macOS vs. Windows experiment applications. Make sure to watch the corresponding video closely.
macOS Applications
Windows Applications
Recommended Settings
1. Use an AutoRun Configuration File
Instead of having to rely on your participants selecting a Configuration File when launching your experiment, we recommend using the AutoRun Configuration File feature. This is described in detail in the Testing Experiments Section.
2. Experiment End Screen/Button
Make sure that you include an experiment end screen Trial which includes the EndButton Attribute-Value Pair. This will allow the participant to press a button to exit the application (see Instruction/Cue Screen Trials).
3. Add a URL to your End Button
Follow the steps below to add a URL to your End Button. When the End Button is pressed, the experiment application will close, and a URL of your choosing will be opened in the participant's default internet browser. This is a useful tool for prompting the user with the website that they must use to upload their data file.
Open the Loading Screen Scene in the Unity Editor. It can be found in the _Scenes folder in the Project window.
Step 2: The Exit Button GameObject
With the Loading Screen Scene open, expand the Canvas GameObject in the Hierarchy window to reveal the Exit Button GameObject and select it.
Step 3: Turn the URL function ON
With the Exit Button selected, navigate to the Inspector window and scroll down to the button's On Click options. Set UrlOpener.Open to Editor and Runtime.
Step 4: Set your custom URL
Below the On Click menu in the Inspector window, you'll find a subwindow titled URL Opener (Script). Replace the default OpenMaze URL to a URL of your choosing.
Step 5: Test it out
You can test whether your URL is working properly directly within the Unity Editor. Add the EndButton Attribute-Value Pair to an Instruction/Cue Screen Trial and run the experiment in the Unity Editor.
Developing OpenMaze
Feature Request and Issue Reporting
To submit a feature request or report an issue in the code base, please visit the OpenMaze GitHub Issues Page and create a new issue. When submitting a request, ensure that you attach the appropriate label to it (e.g., feature request, bug, help wanted).
Sharing Changes
Through the OpenMaze GitHub page you can clone or fork the OpenMaze project. This will allow you to submit your changes to the OpenMaze team by submitting a GitHub pull request. Upon receiving a pull request, the OpenMaze development team will review your changes and coordinate their implementation with you.
Tip: Before making large changes to the source code or adding functionality, we encourage you to reach out to the OpenMaze development team for guidance to ensure that the final implementation process is quick and easy!
Feature Diagnostics
When making changes to any aspect of the OpenMaze source code it is important to ensure that your changes do not impact other functionality. We have made it easy to test this by including a Test_All_Features Configuration File with OpenMaze. This Configuration File can be found in the OpenMaze/Configuration_Files/FeatureTest folder. This Configuration File includes a test Trial for every OpenMaze feature and many combinations of features. Inspecting this Configuration File, you'll find that features are divided into sections, which are then divided further into subsections using Blocks. You will also notice the sequential ordering of feature tests, with each feature being first tested on its own and then in combination with other features. Blocks can be added or removed to test specific features and/or combinations of features, allowing you to pinpoint any issues.
This website and software is not sponsored by or affiliated with Unity Technologies or its affiliates. Unity Trademarks are trademarks or registered trademarks of Unity Technologies or its affiliates in the U.S. and elsewhere.